Archive for the ‘Side Dishes’ Category
Chopped: ECA Edition, big fun!
The organization that I work for had a fun team building activity a couple of weeks ago that was right up my alley. Right up my alley, that made me snicker. Where did that phrase come from anyway? You know I am going to find out. And, apparently, the origin of the phrase goes back as early as the 1600’s, with the word “alley” referring to something being part of one’s province. The exact phrase is also documented in a 1931 court case. In the 1930’s the slang term “up one’s street” was commonly used in the same reference. Okay, I digress, but now we know.
Our team building committee came up with their own version of the popular Food Network show, Chopped. The rules were slightly different. Employees received an envelope of six unique “mystery ingredients.” There were several different lists. The challenge was to come up with a dish using at least three of the ingredients for a staff carry-in. Dishes were judged and awarded very interesting prizes in four categories: Most Creative Use of the Ingredients, Presentation, Taste (featuring at least 3 ingredients), and Most Ingredients Used with Best Taste. We weren’t timed and didn’t have to cook onsite, thankfully. However, it was just a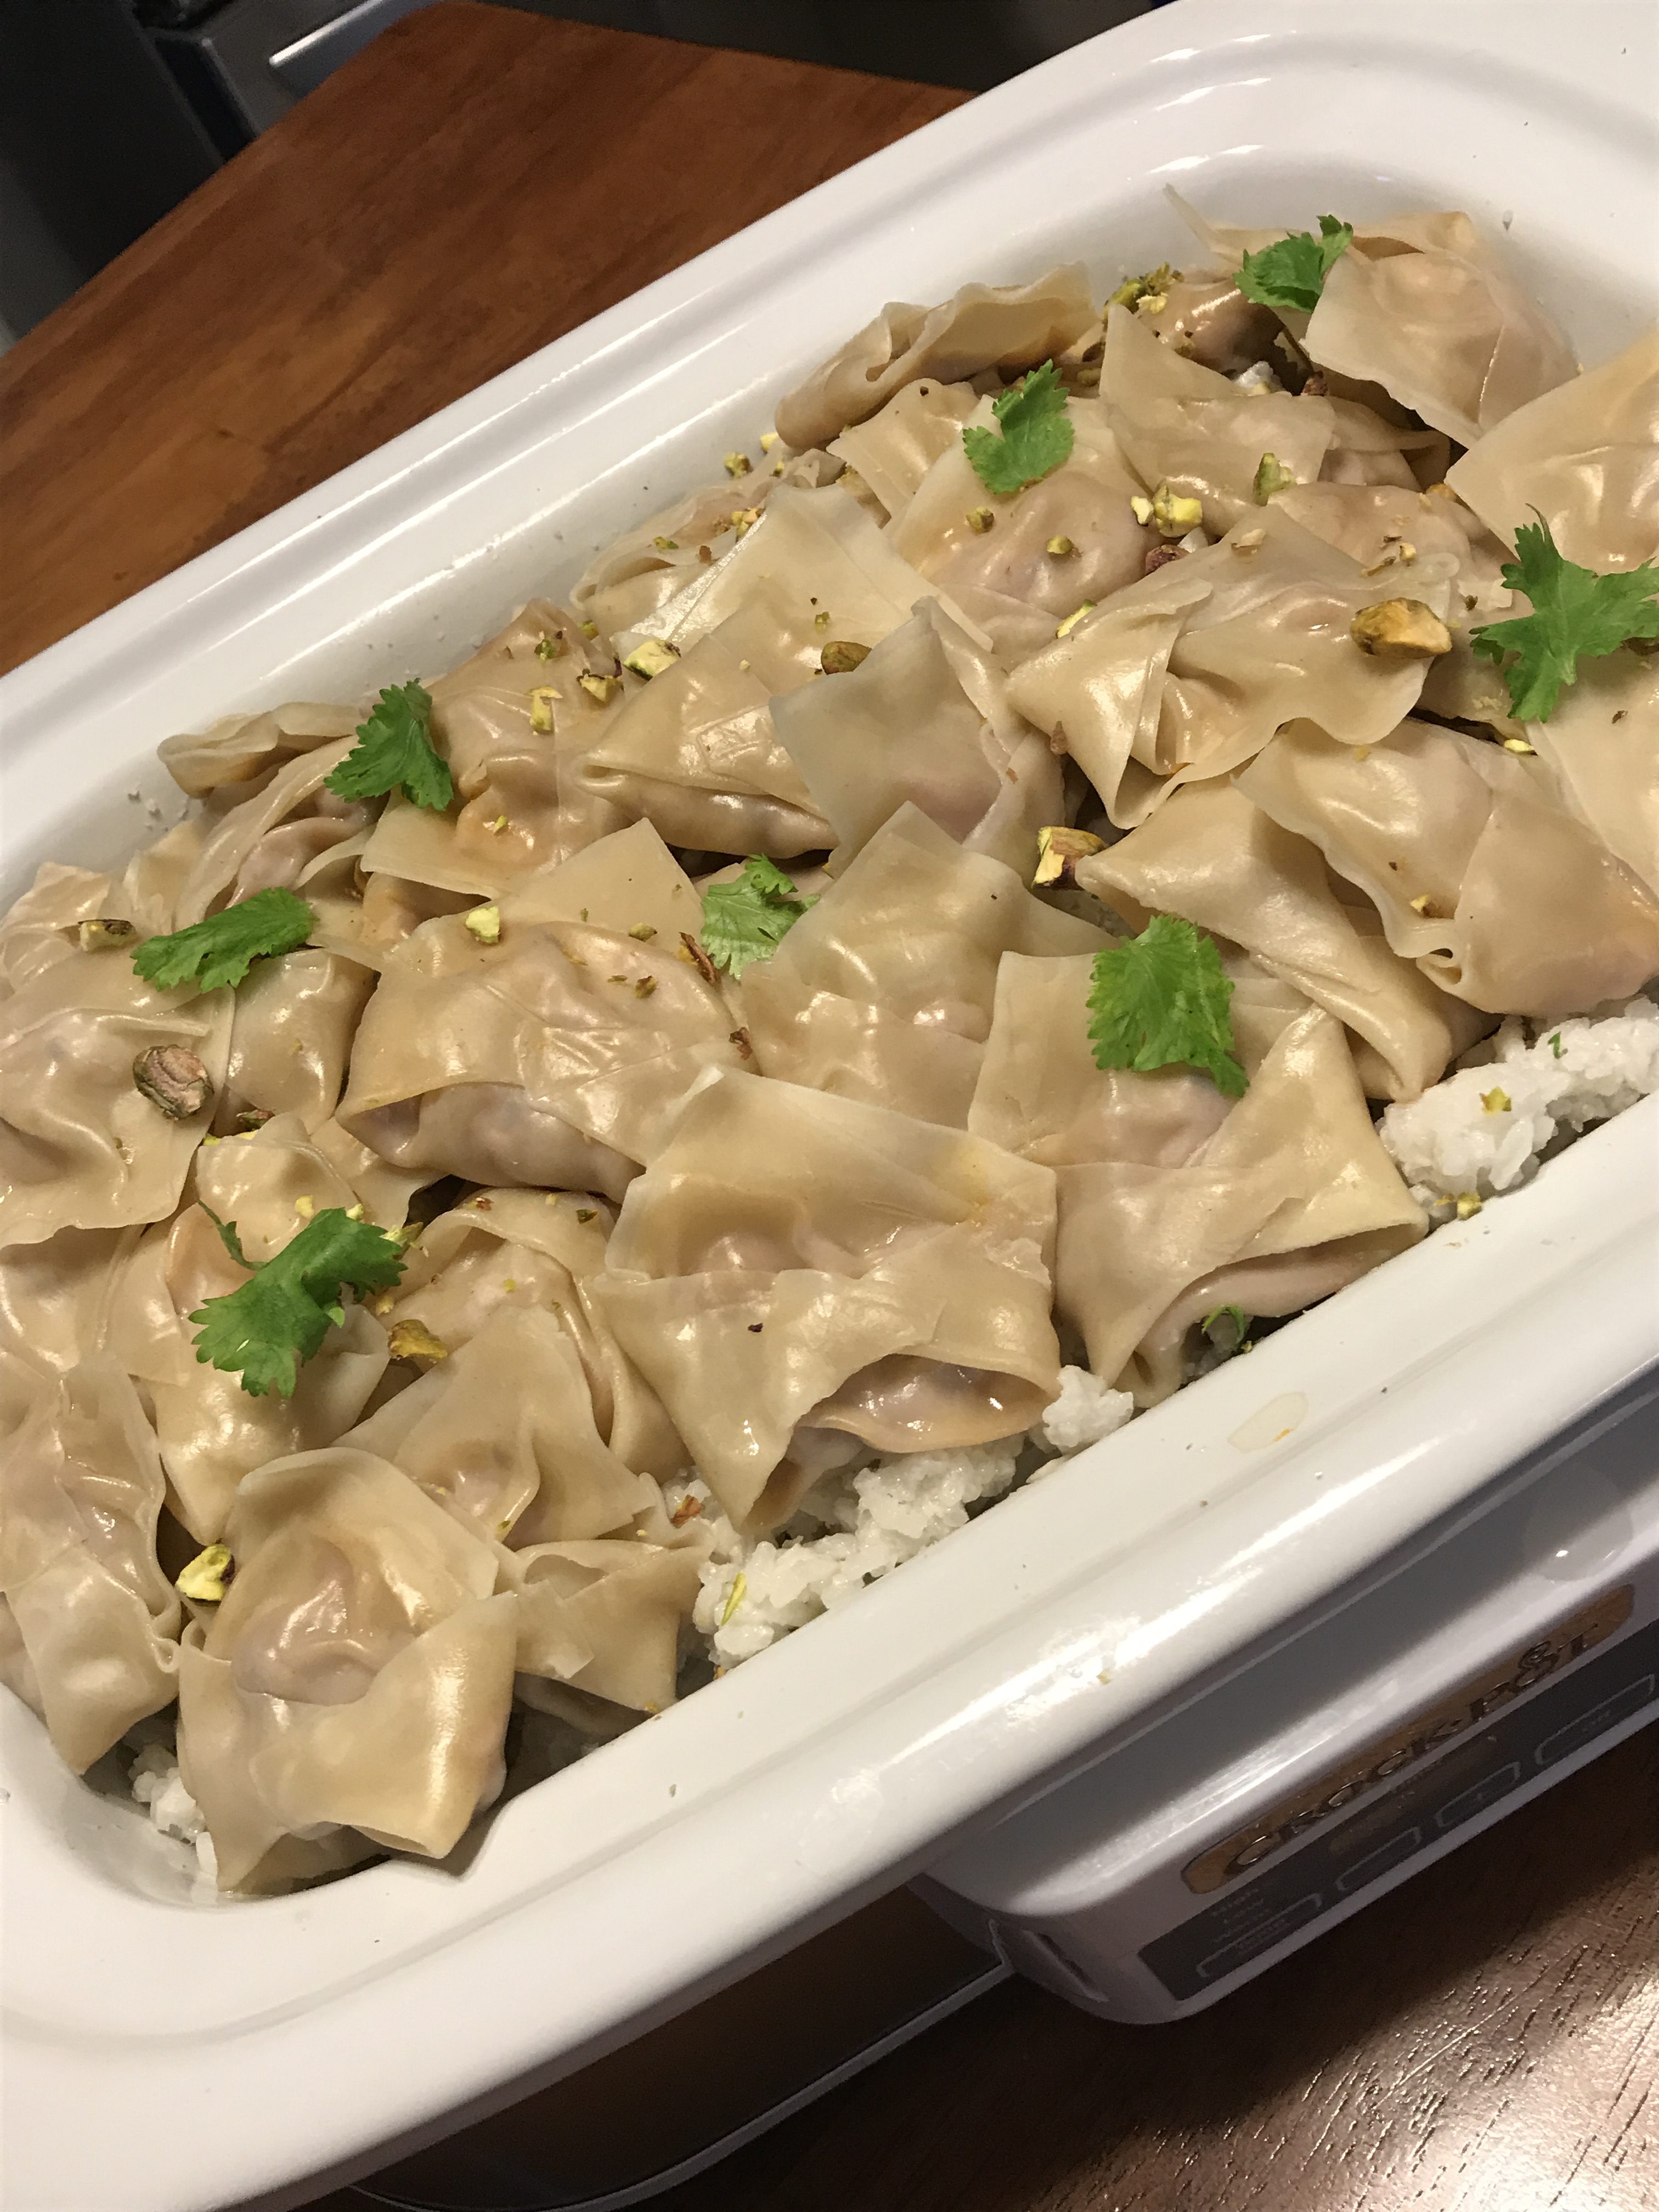 s challenging coming up with something that could be easily transported and re-heated. I am amazed we didn’t blow a fuse with all of the crockpots that were plugged in at the office that day!
I was challenged to produce something fairly creative and tasty, first, because many of my co-workers know I own a food business so I figured they would have high expectations, and second, because I am just highly competitive. 🙂 I had a strategy. I did what I thought others would do, and searched the world wide web for recipes that used many of the ingredients on the list. The list I was given screamed “dessert” to me, and sure enough those were the type of recipes that popped up. My list included Apricot Preserves, Star Fruit, Coconut Milk, Wonton Wrappers, Pistachios, and Nutella. See, sounds like dessert.
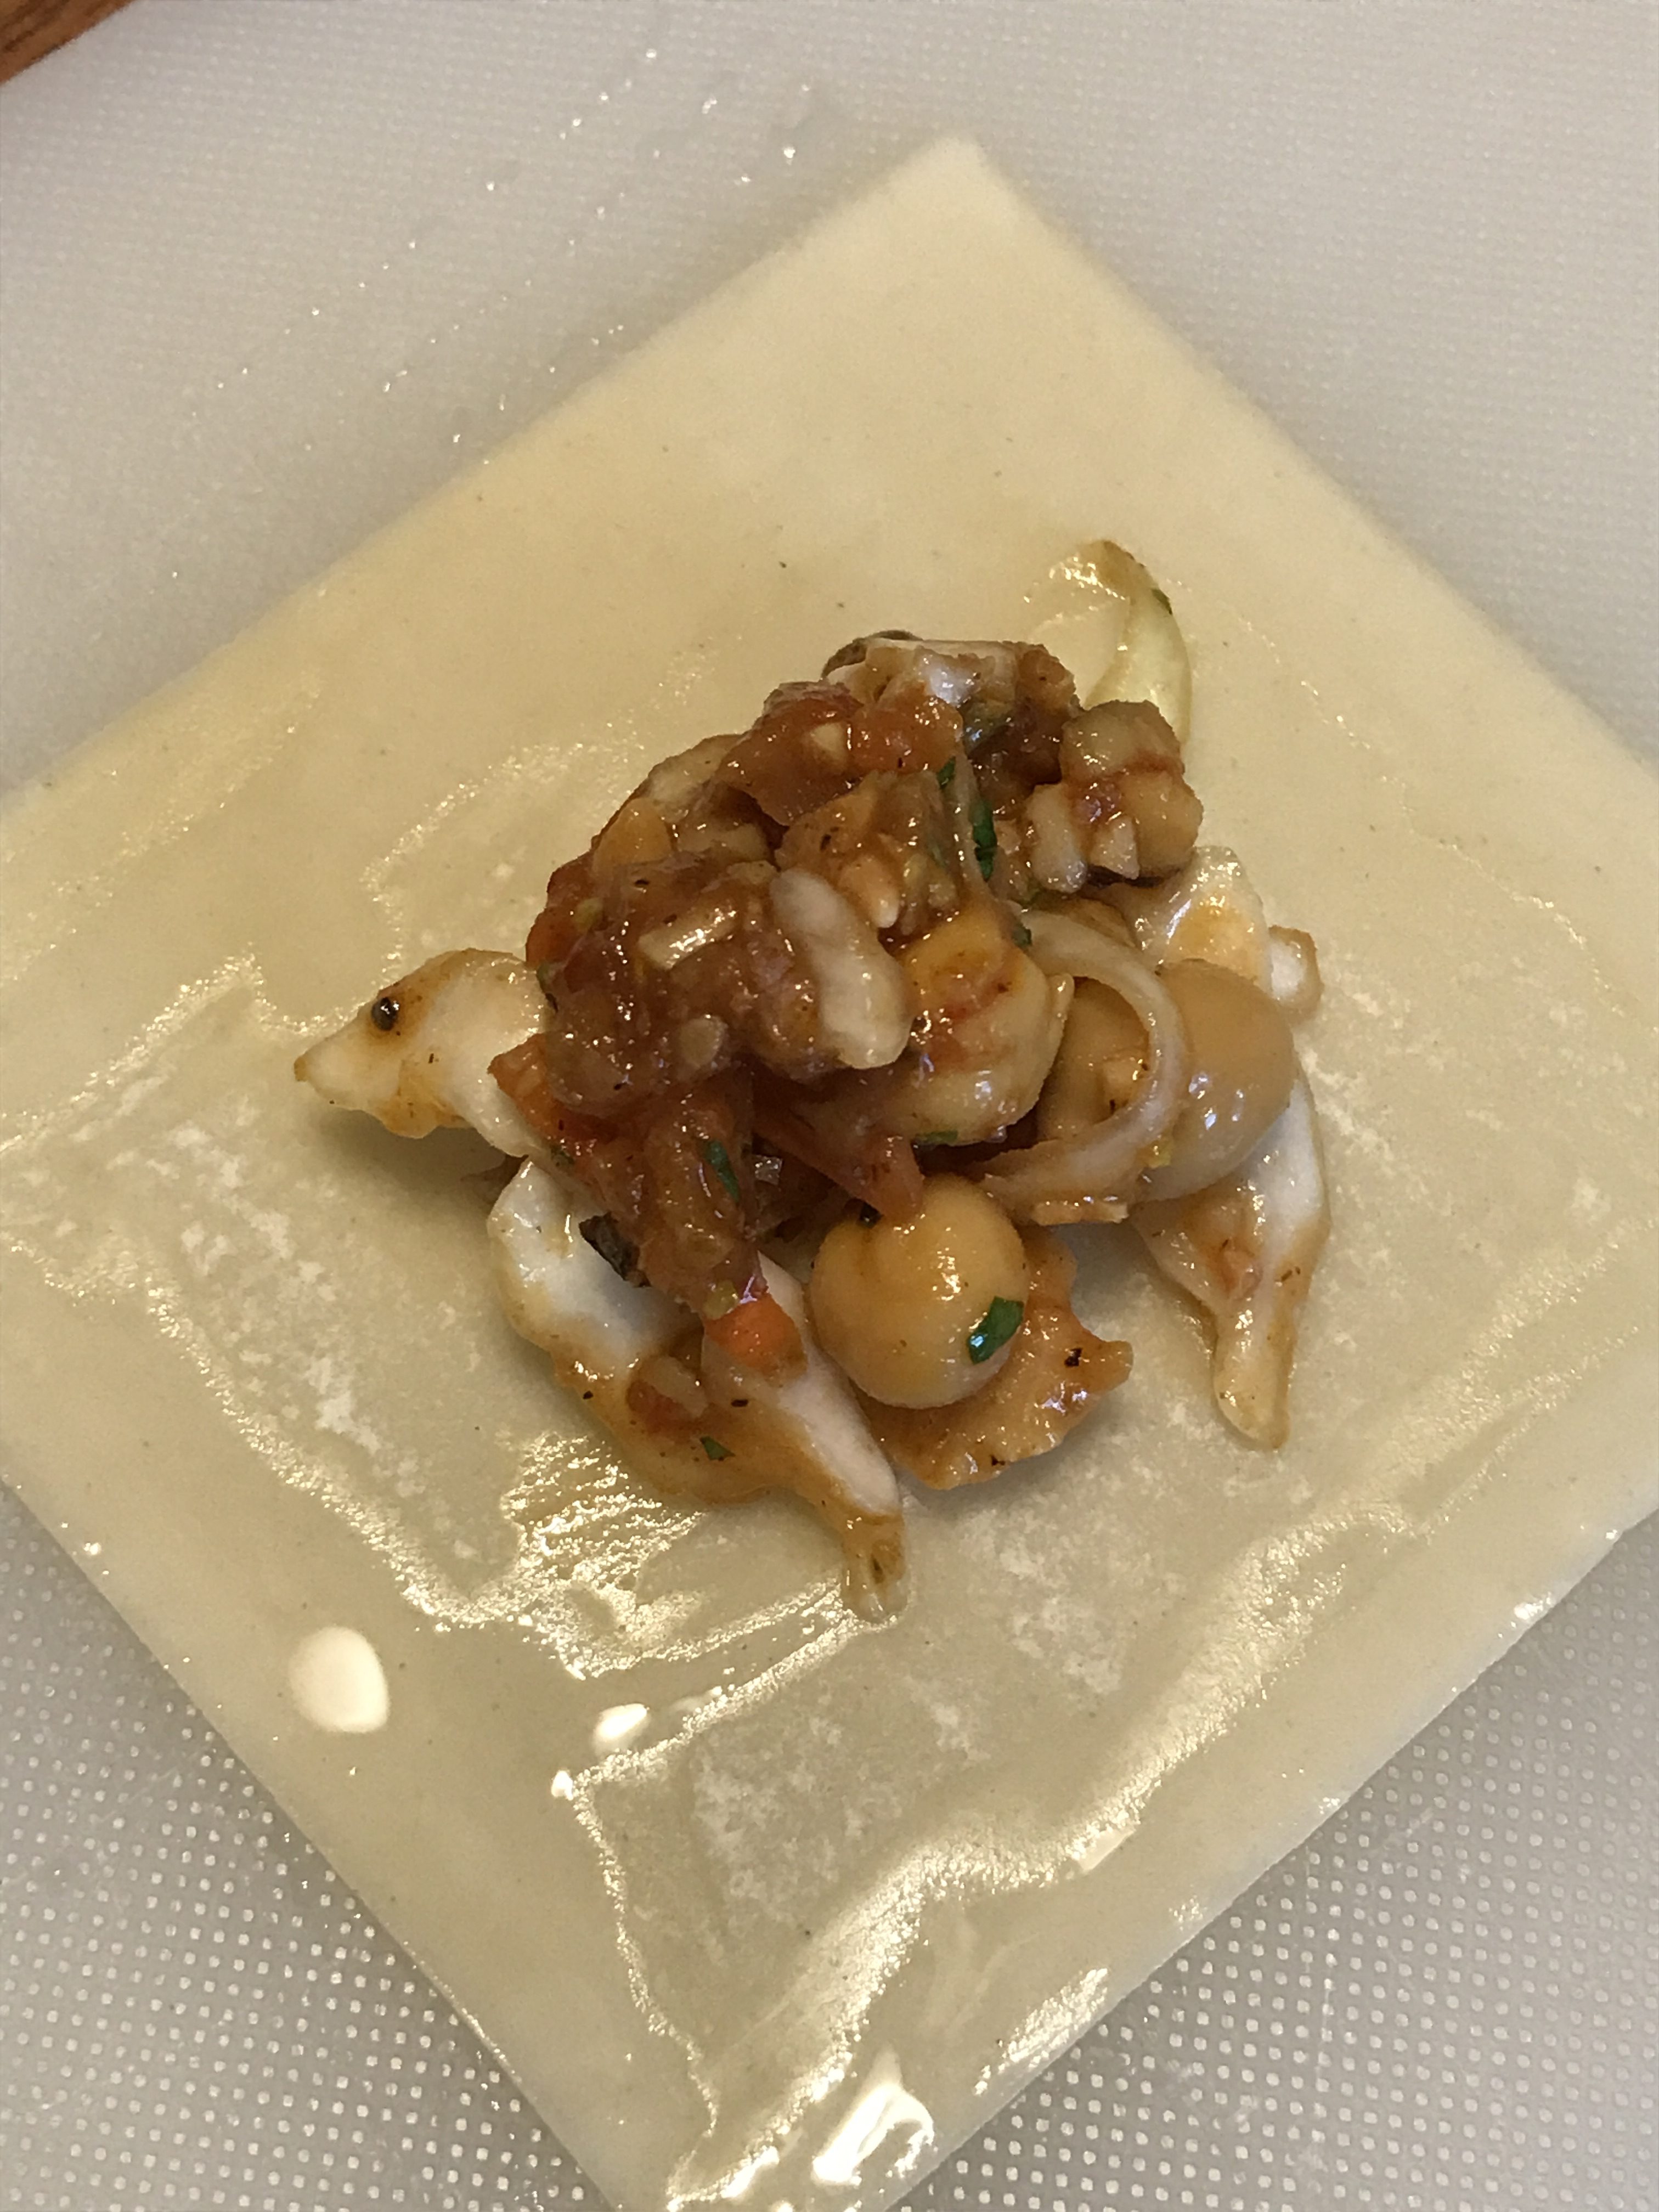
So, I went another direction. Several of my ingredients are used in Moroccan cooking, which I love, and pair well with my Ras el Hanout blend. Ras el Hanout is a blend of “top shelf” spices including Coriander, Ginger, Cumin, Black Peppercorn, Turmeric, Cinnamon, Orris Root, Cardamom, Rose Petal, Fennel Seed, and Star Anise. The spices for this blend are first toasted to release the oils, then put through the grinder. They smell unique but amazing. I came up with the dumpling recipe by writing a variation of an Asian wonton or dumpling. Several of my co-workers are vegetarian so I decided to make the dumplings without meat. I could have used tofu, but I had chickpeas in the pantry, and use them in other Moroccan dishes, so chickpeas became the protein in the dumplings. Since Star Fruit isn’t readily available in my rural grocery, I decided to use it similar to dried apricots, and ordered the dried version from Amazon.
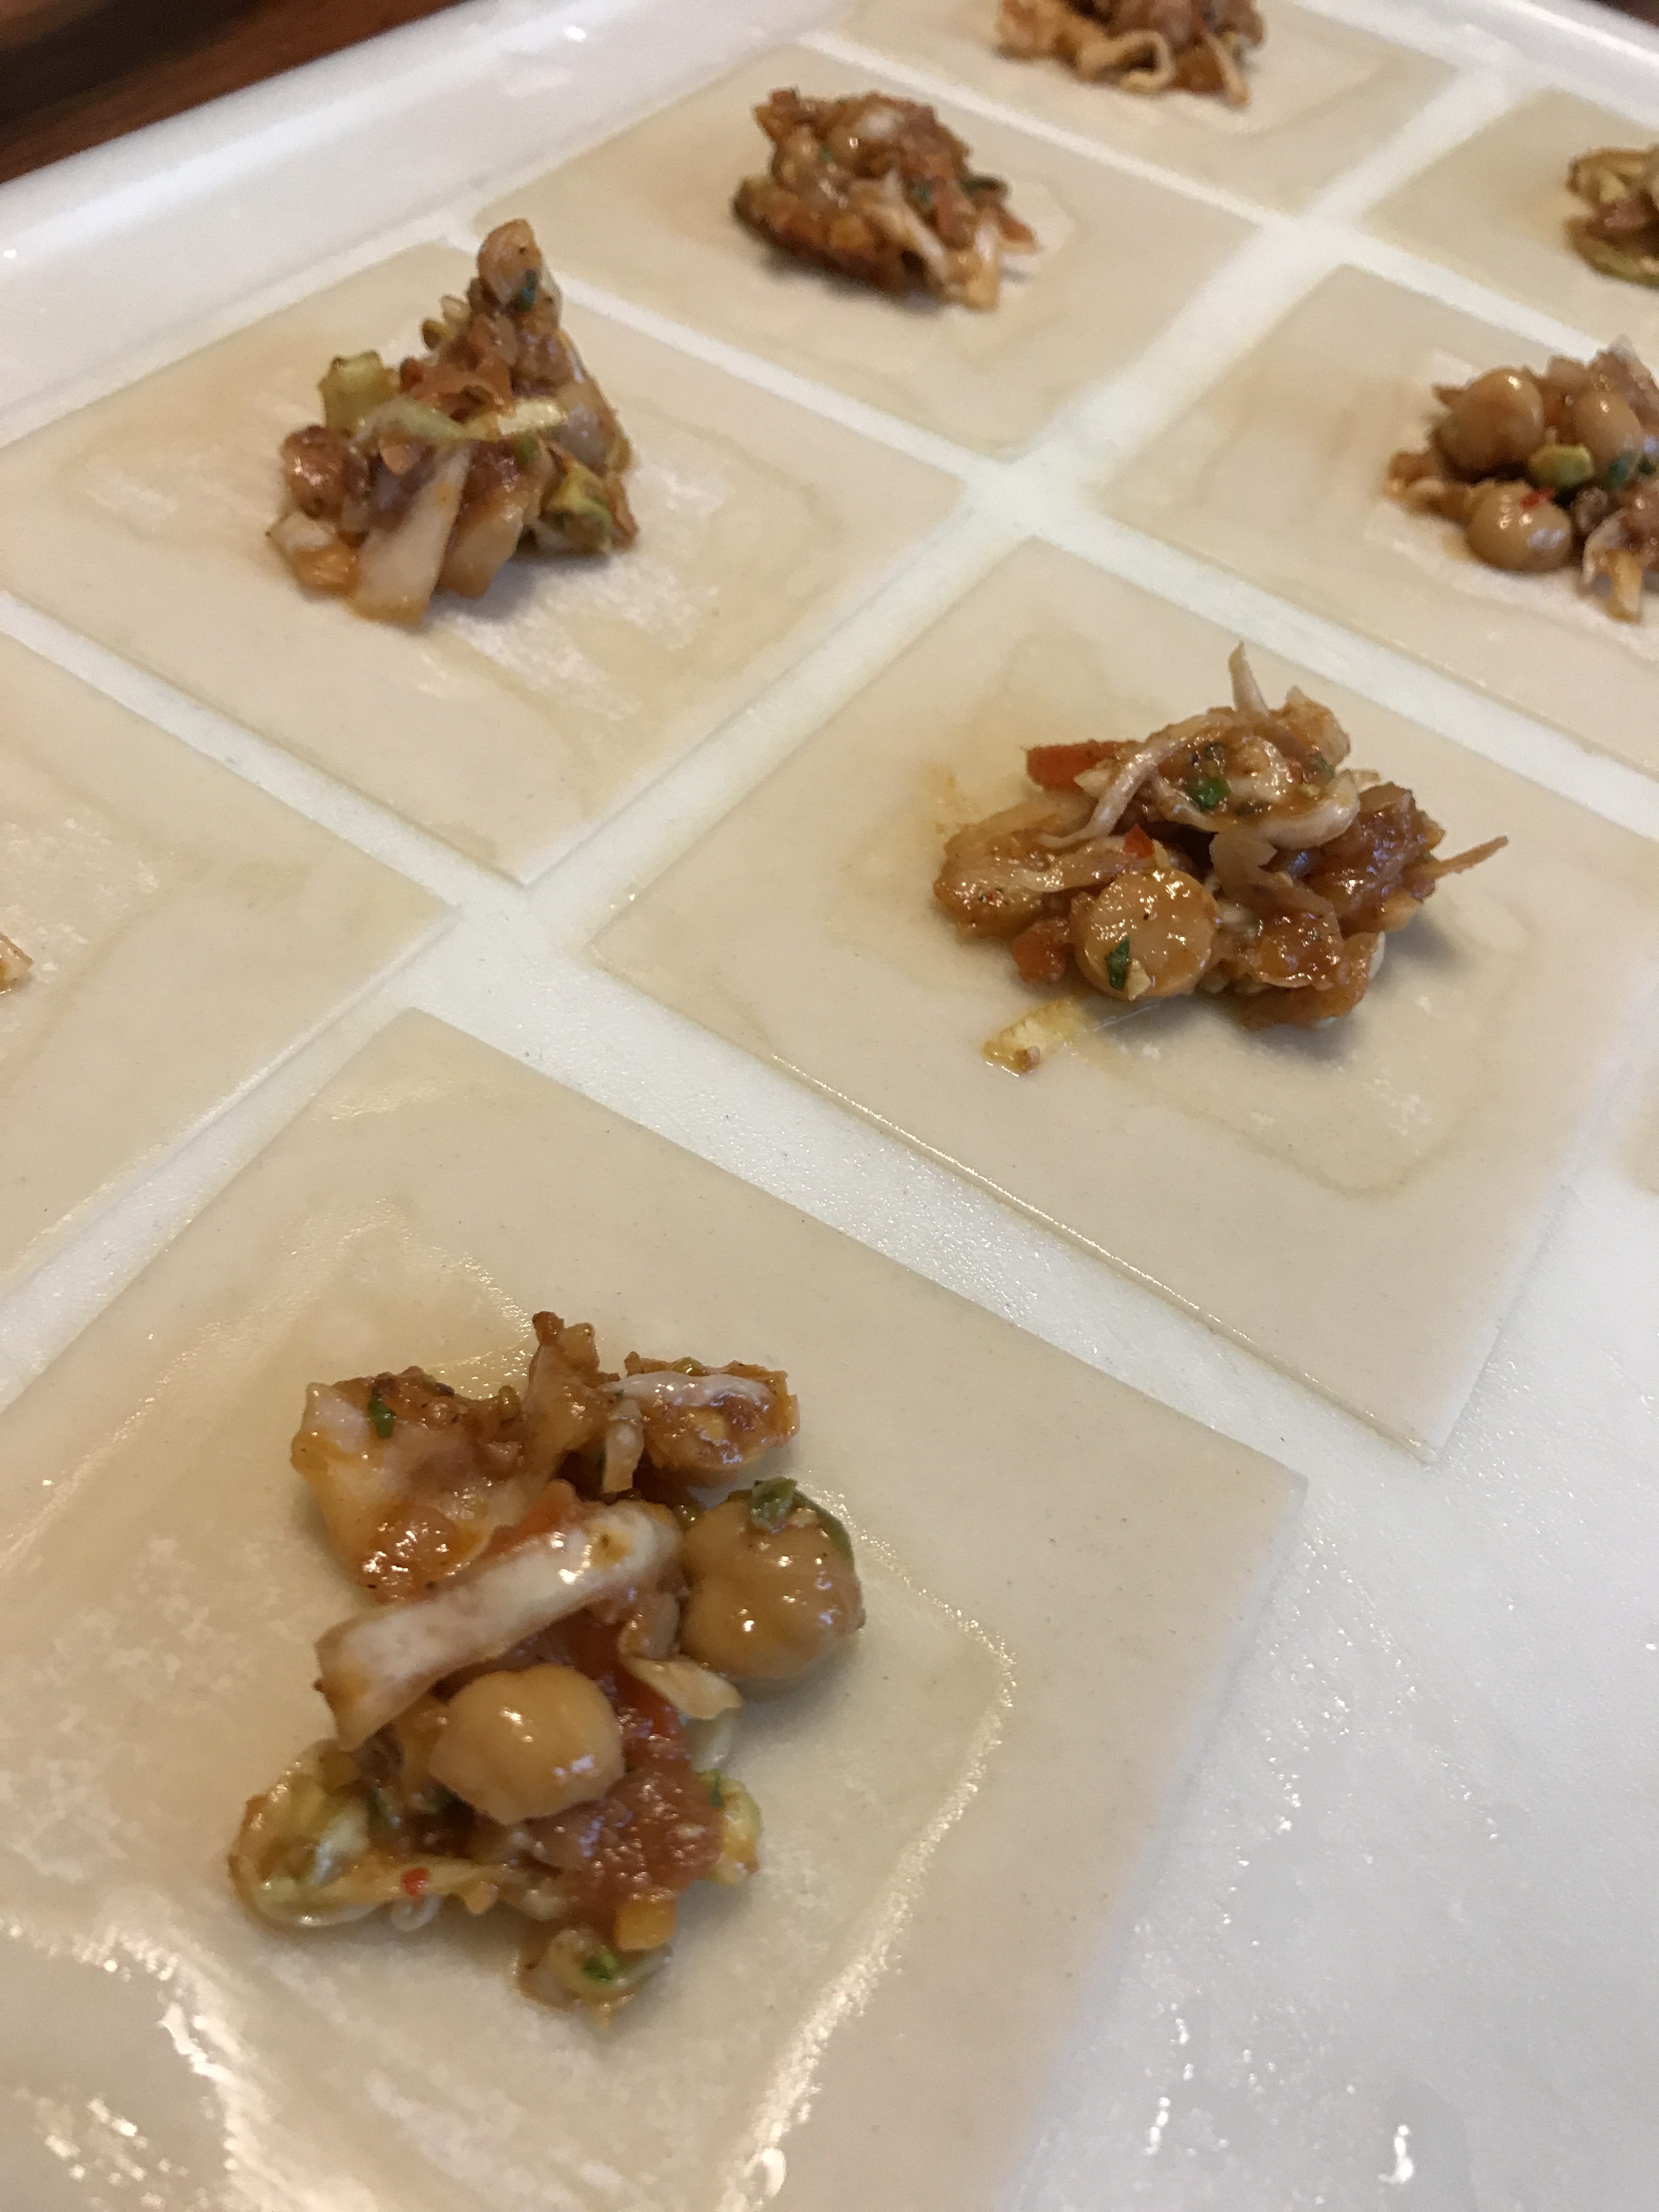 Now, let me just mention. Making dumplings takes skill. Skill that I apparently don’t have. It takes practice, lots of it! Folding them is time consuming. After you get the hang of it, the process goes a bit faster. But, plan on throwing a couple in the trash, and being okay if they aren’t even close to uniform. For the sake of space in the steamer and in the crockpot, I gave my dumplings an extra fold. I also folded and then steamed a
 few dumplings to sample before attempting origami with the fragile little squares.
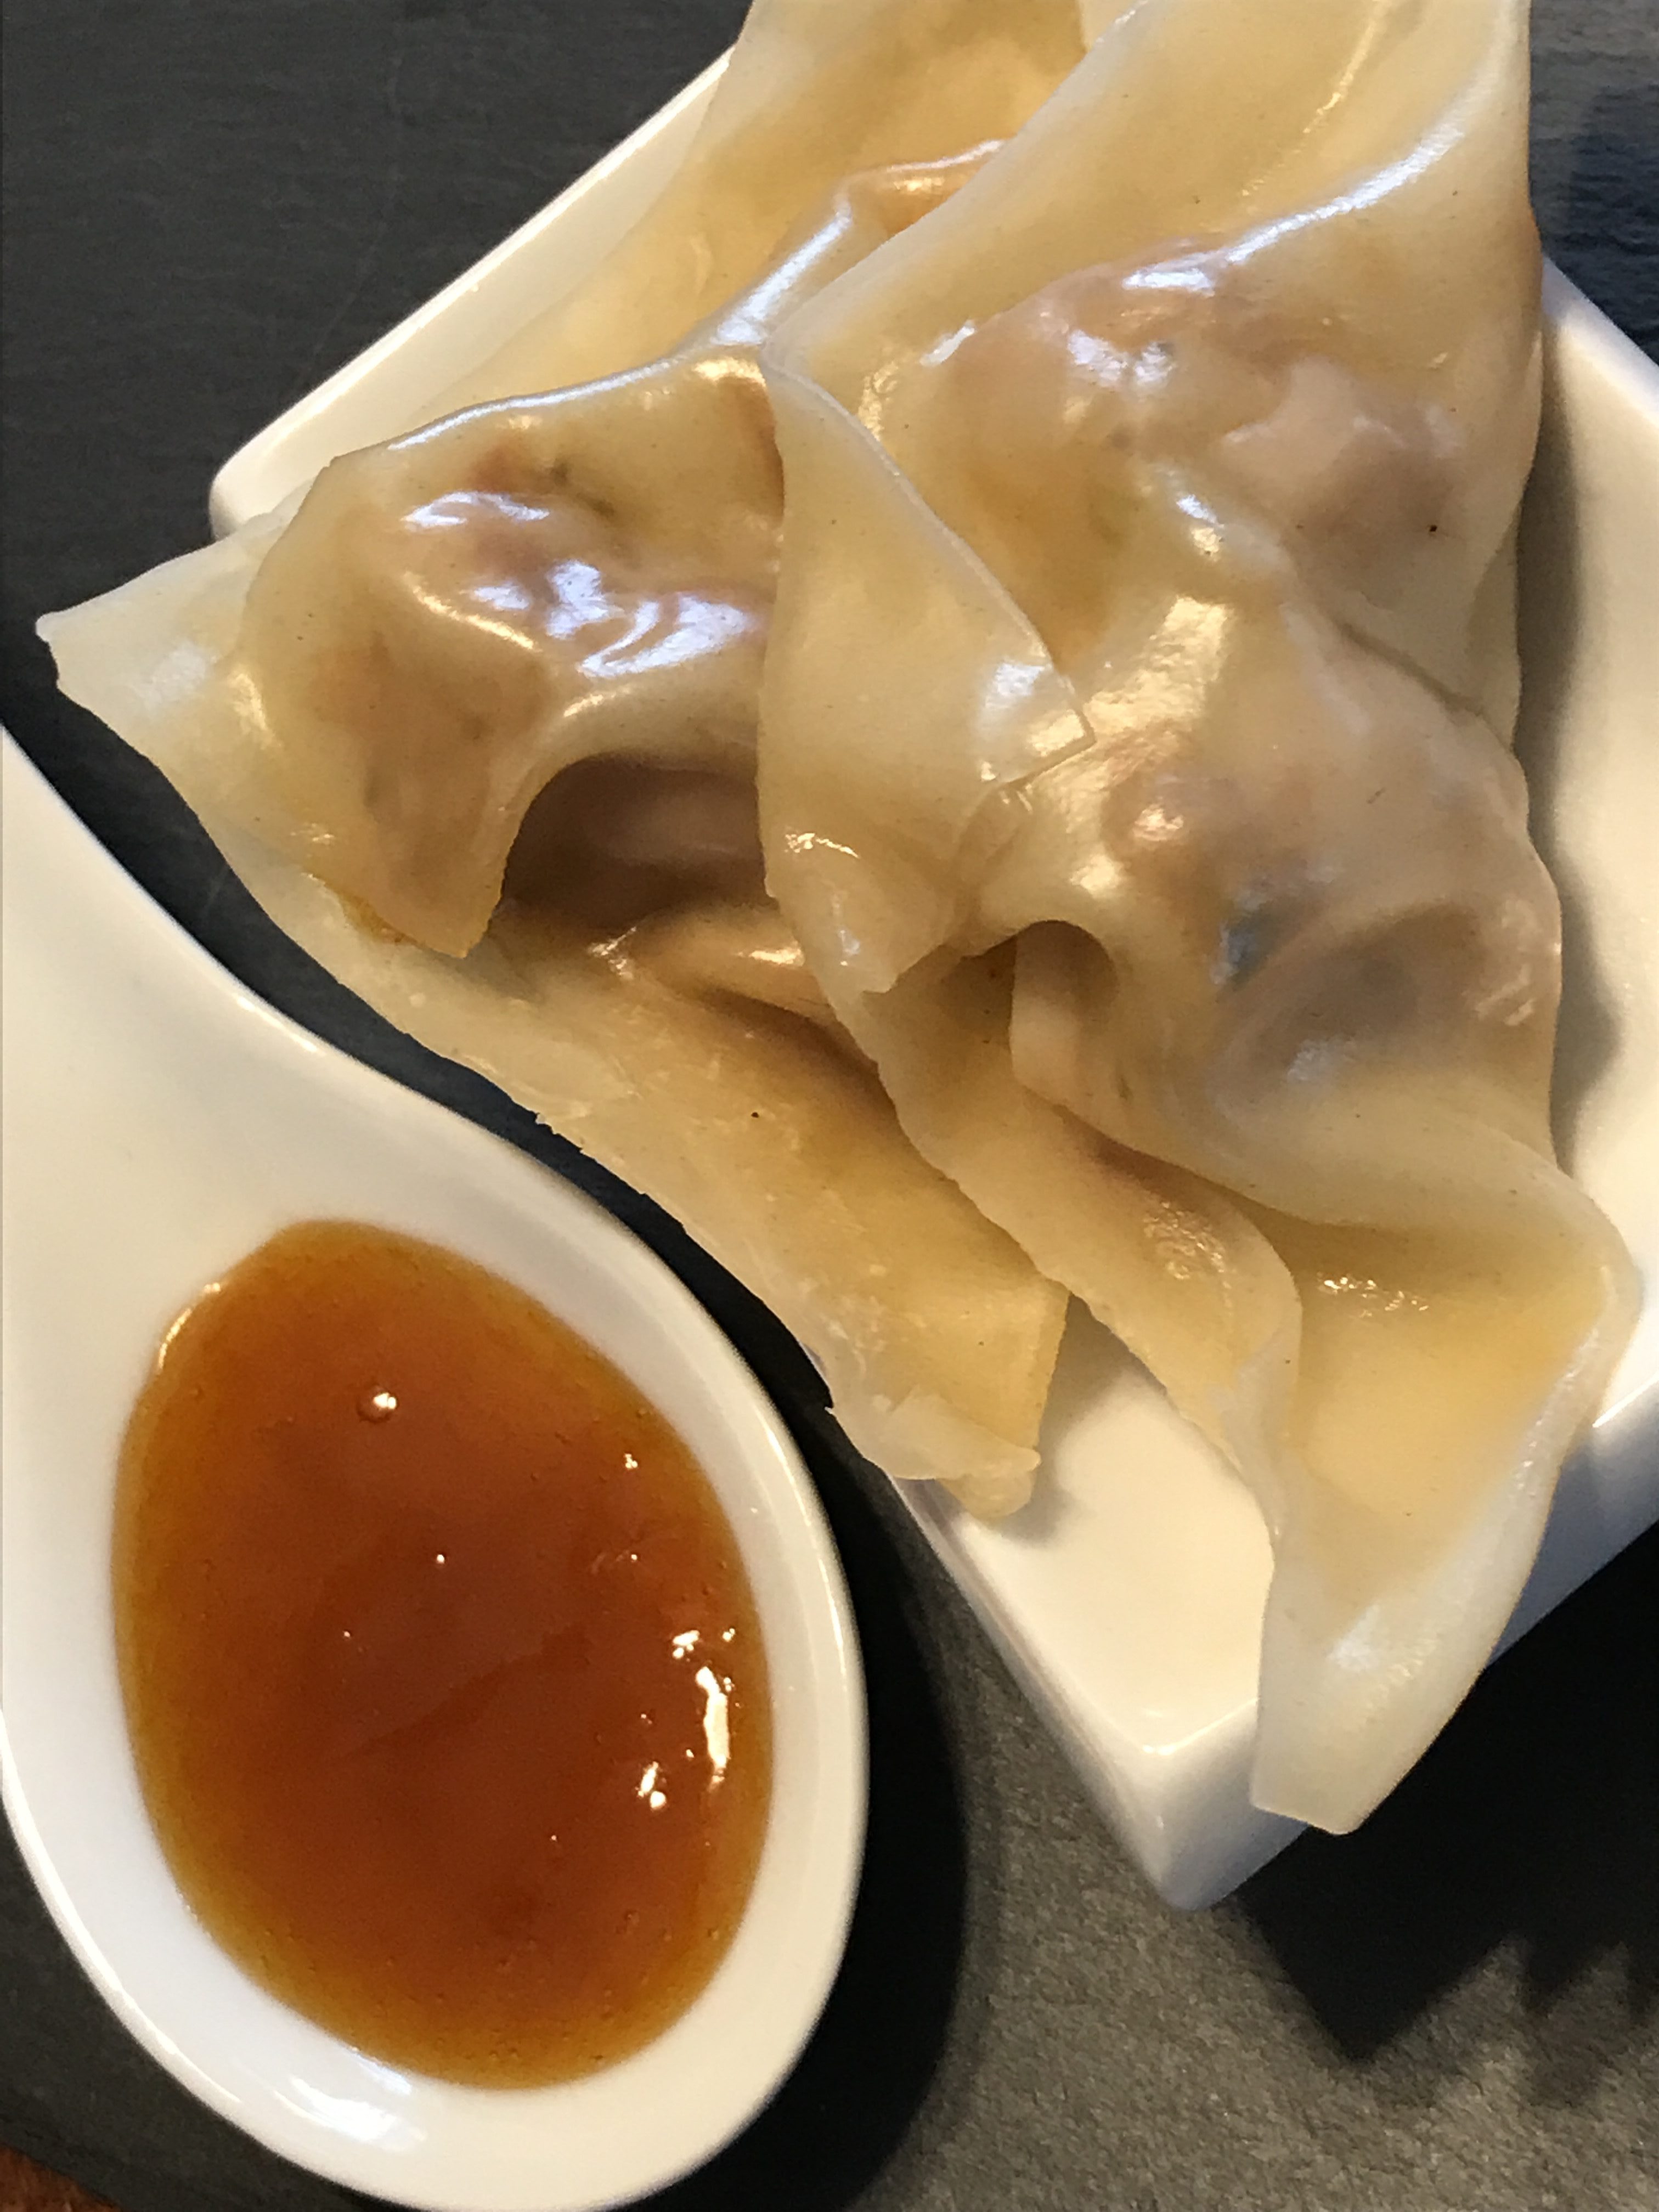
I know you all are w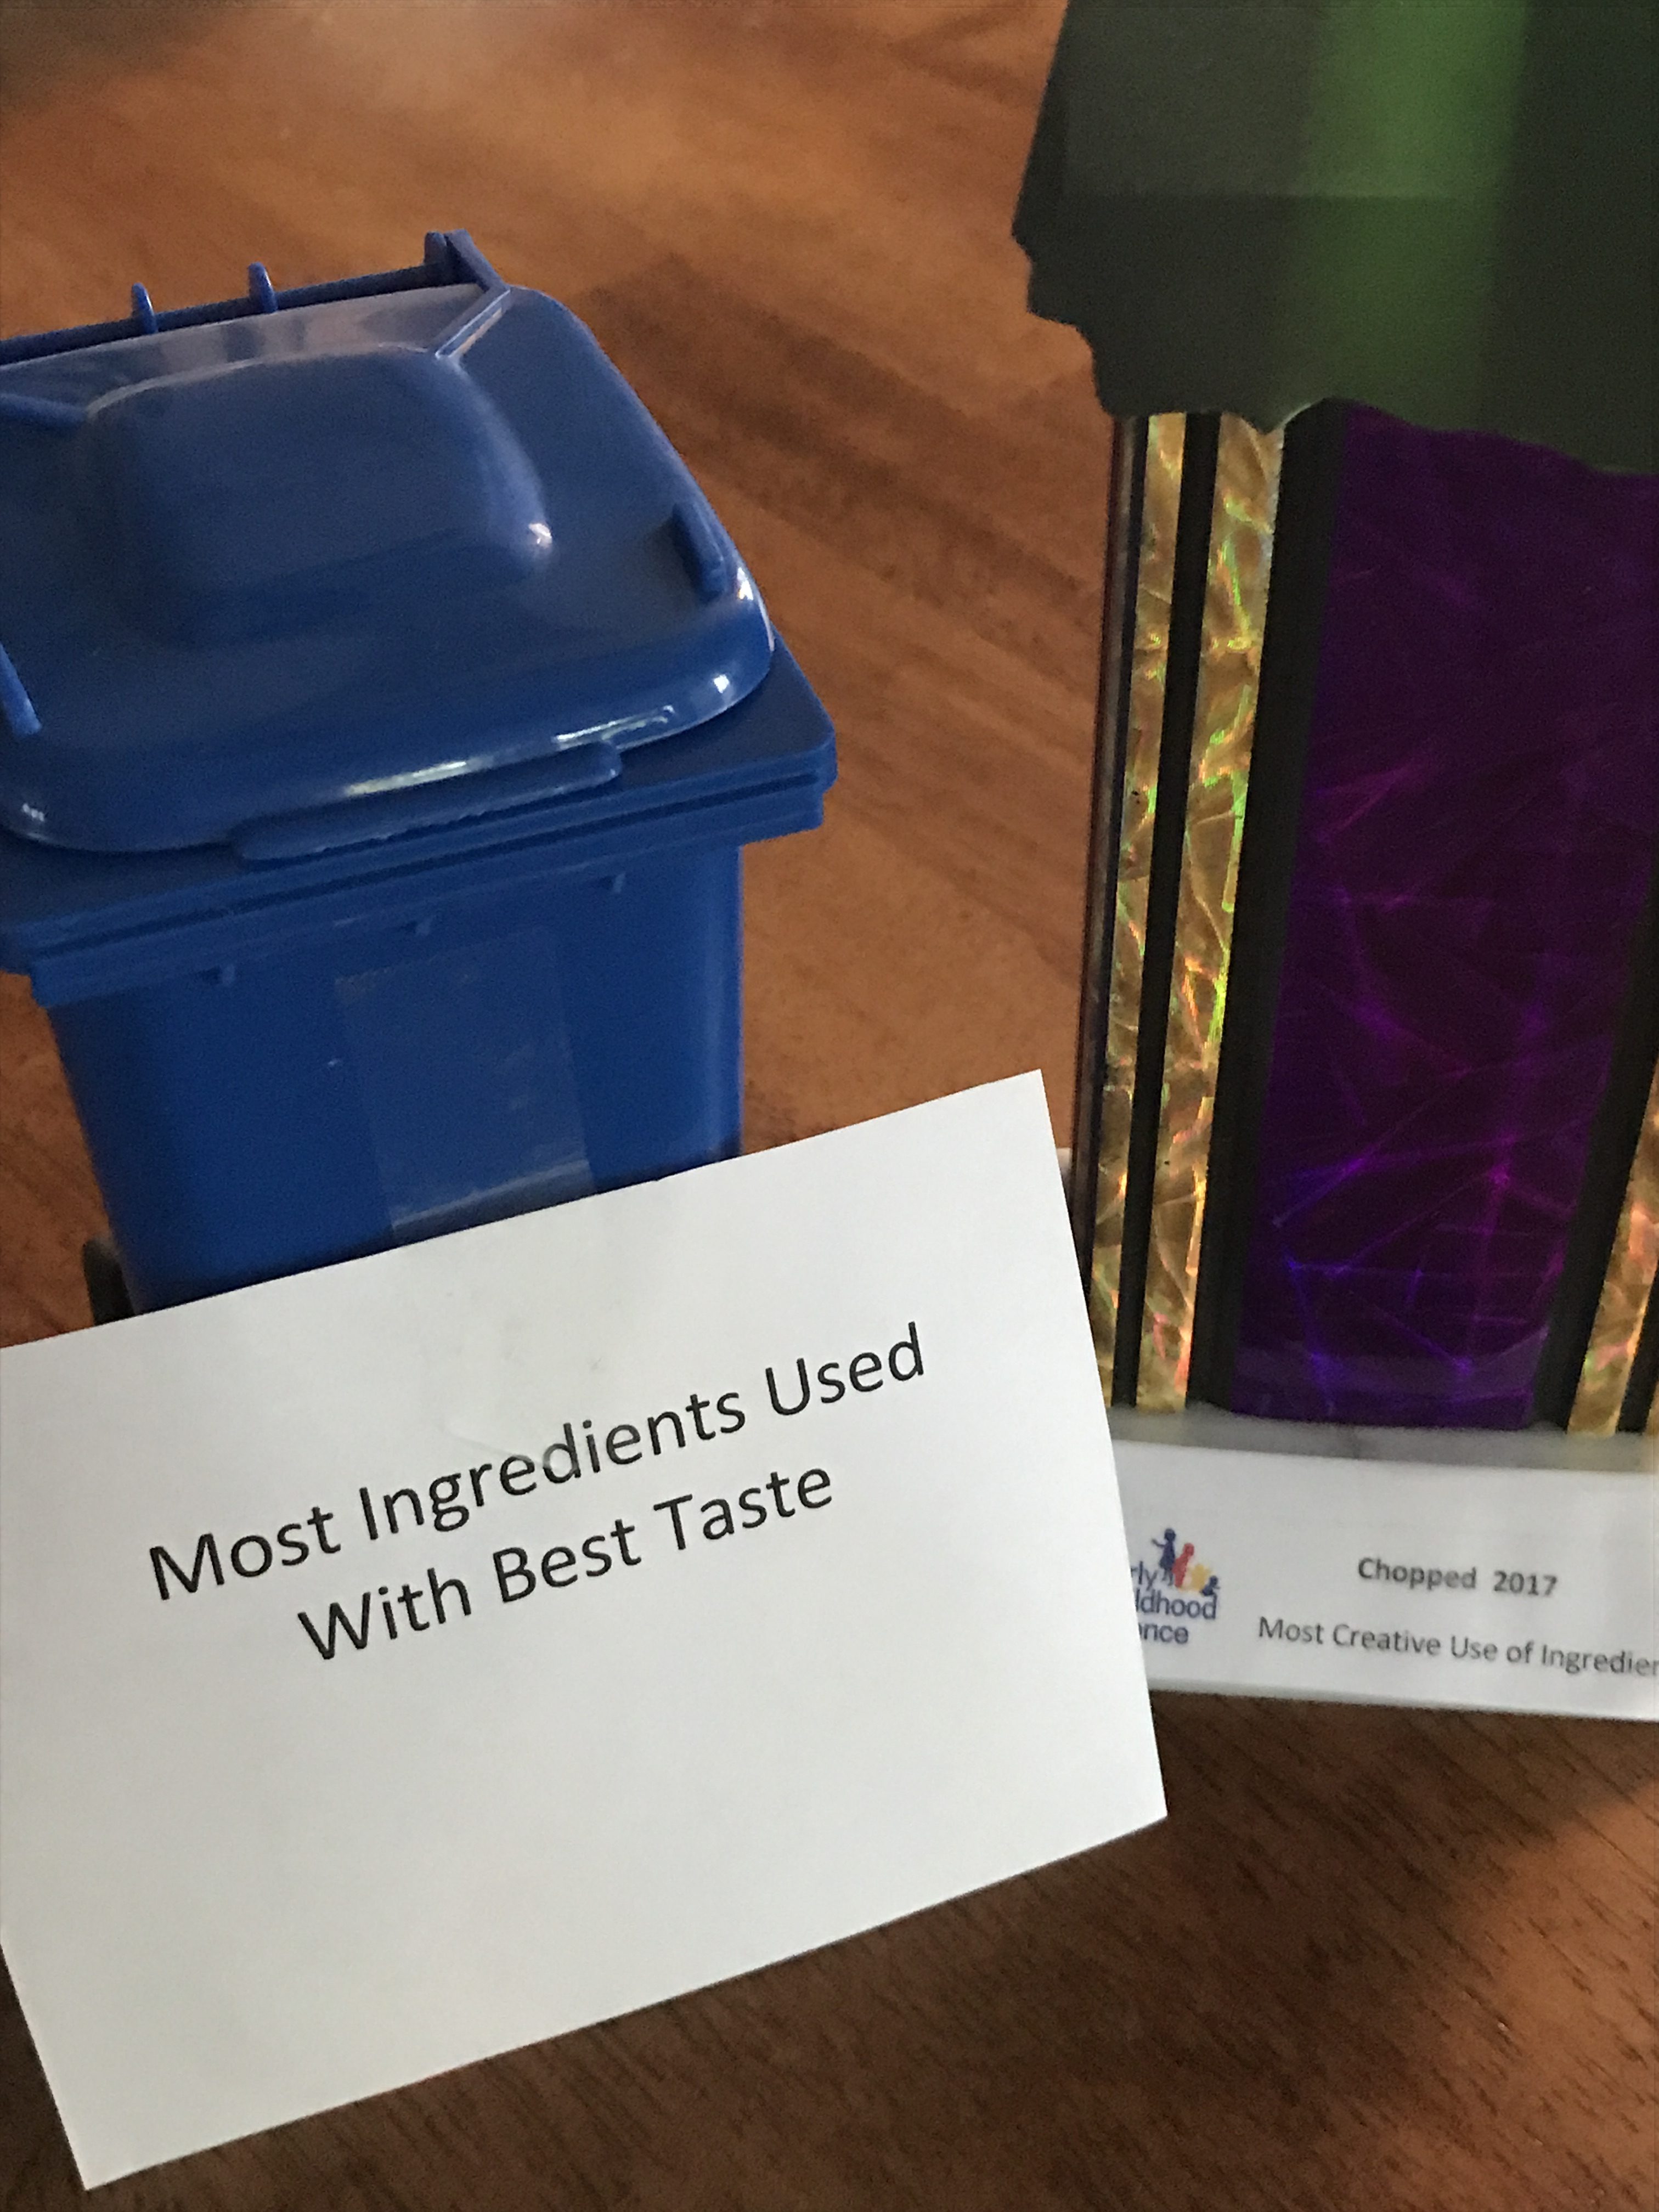 ondering. Yes, this tasty dish was the winner of not just one, but two of the categories. I was awarded a trophy for Most Creative Use of Ingredients, and a tiny garbage can full of candy for Most Ingredients with Best Taste. Kudos to the team building committee for their creative prizes! (Really guys, cash would have been just fine, haha!)
The dumplings would make a great appetizer. The rice can be served as a side dish to an entree such as Tangine Chicken Thighs. Or, you can serve the dumplings with the rice, as I did.
I would certainly suggest eating right away though both the rice and the dumplings did heat well in the crockpot. Another suggestion, prepare dumplings with children. Then you can put them to work on the tedious stuffing and folding. Win, win! They get a cooking lesson, and you don’t have to fold. Enjoy!
Moroccan Dumplings with Apricot Dipping Sauce & Sticky Coconut Lime Rice
Author: Changing Seasonings
Recipe type: Appetizer, Dinner
Cuisine: Moroccan
Prep time:
Cook time:
Total time:
Serves: 30-40 dumplings
Ingredients
- For Dumplings:
- 1 15oz can Chick Peas (can substitute ½lb firm Tofu or ground pork or turkey)
- 1 ½ C Slaw Mix (or chopped cabbage and carrots)
- 2T Scallions
- 2t grated fresh ginger
- 1T Harissa
- 2T chopped Pistachios
- 2T chopped dried Star Fruit
- 1T fresh Cilantro
- 1t (1clove) minced fresh Garlic
- 1T Soy Sauce
- 2t Sesame Oil
- 1 Egg
- 1t Kosher Salt
- ¼t ground Pepper
- ½t Ras el Hanout seasonings
- 35-40 Wonton Wrappers
- For Dipping Sauce:
- 1 12oz jar Apricot Preserves
- 1T Soy Sauce
- ¼ C Rice Vinegar
- For Rice:
- 1 C Jasmine Rice uncooked
- 2 ½ C Coconut Milk (can add water to make full amount)
- ½ t grated fresh Nutmeg
- ½ t grated fresh Ginger
- 1T chopped fresh Cilantro
- Juice of ½ fresh Lime
Instructions
- Mix dumpling ingredients except wrappers.
- Use 1t filling for each wonton.
- Wet and seal edges.
- Steam for 10-12 minutes.
- Whisk together the sauce ingredients. Reserve for dumpling dipping.
- Cook rice to package instructions.
- Add nutmeg and ginger while cooking.
- Add lime juice and cilantro before serving.
- Garnish with chopped pistachios.
How does it happen that so many weeks have gone by since I last posted?? My son and I have been spending most of the summer at the lake with family and friends. I really need to get an Internet connection here! Instead of typing, I just relax and take in this amazing view!

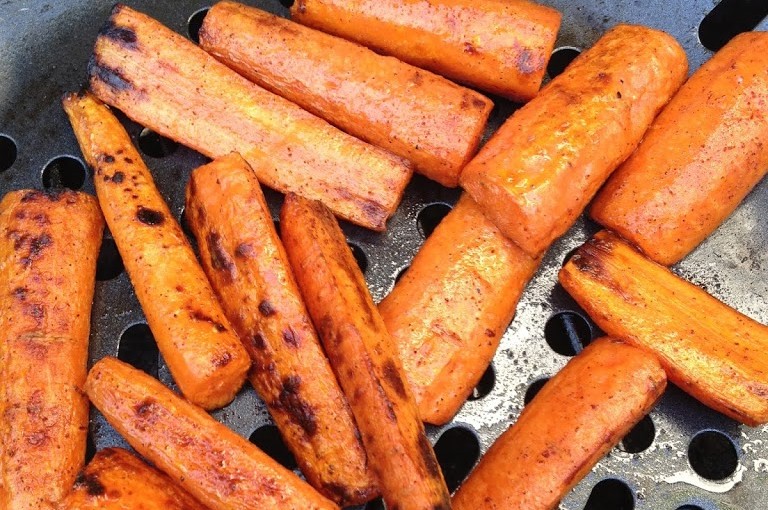
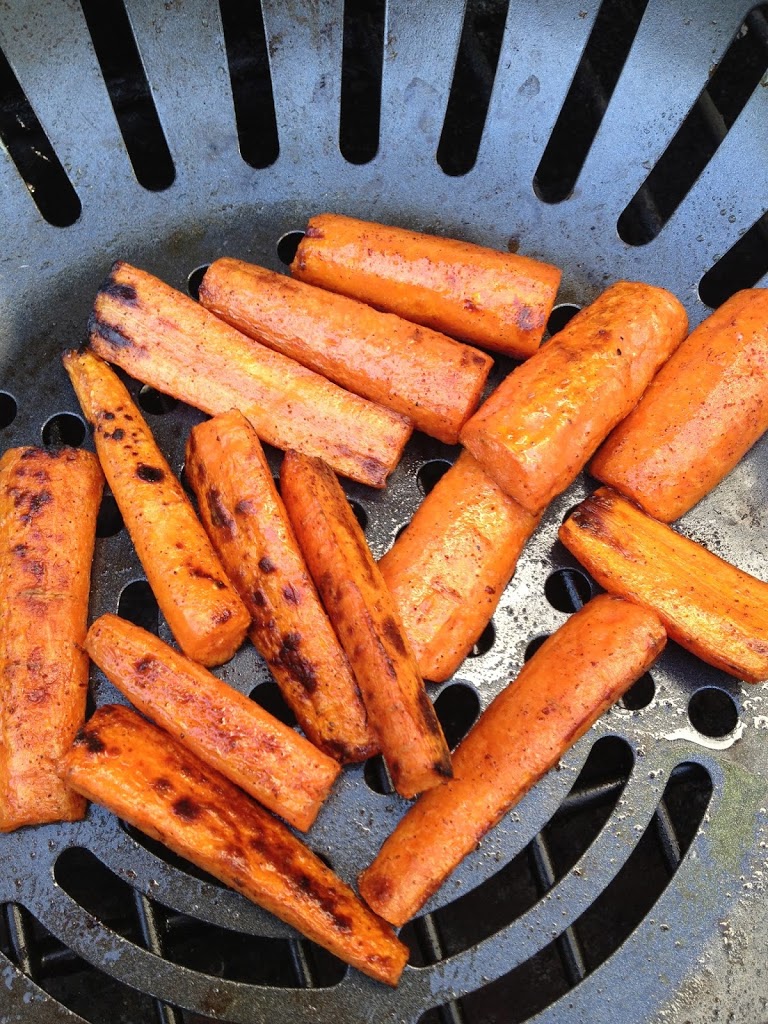
When it’s warm outside, I cook outdoors on the grill as much as possible. Grill cooking tends to be healthier than some of the heavier, gravy-laden comfort foods of the cold weather months. Especially when we steer away from the higher carbs for the cleaner eating proteins and vegetables. And, honestly, I’ve yet to find a vegetable that doesn’t taste wonderful roasted over a flame.
I typically try to mirror the spices I use to marinade or rub the meat in flavoring the vegetables. Simply toss the vegetables in olive oil and sprinkle with spices. If I am going to serve the vegetable with a Balsamic reduction, I typically just season with salt and pepper. Place in a grill pan and grill while the meat is cooking, tossing occasionally. I use a grill pan/veggie basket to prevent the vegetables from falling through the grill rack. Click here to see the type of grill pan that is my favorite because it fits next to the meat on most grills, and the holes help the vegetables to roast evenly and quickly. Most vegetables take about 20 minutes.
Here are several of my favorites:
 |
| Cinnamon Carrots: toss with olive oil, salt and cinnamon |
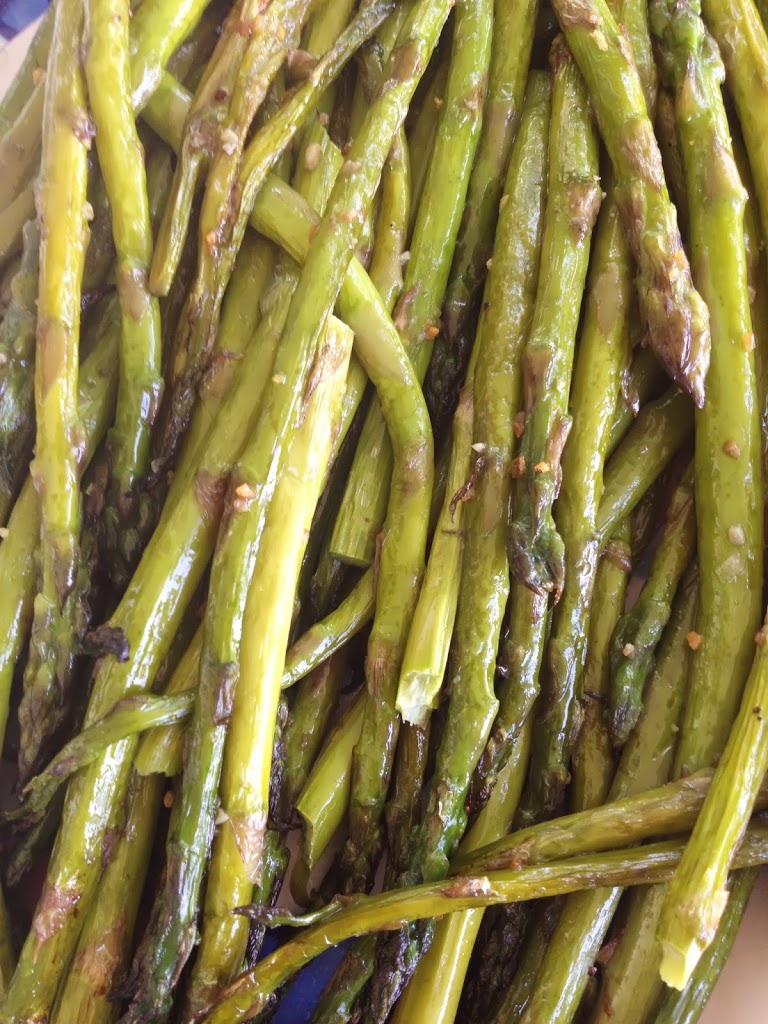 |
| Grilled asparagus: toss with olive oil, salt, pepper and minced garlic |
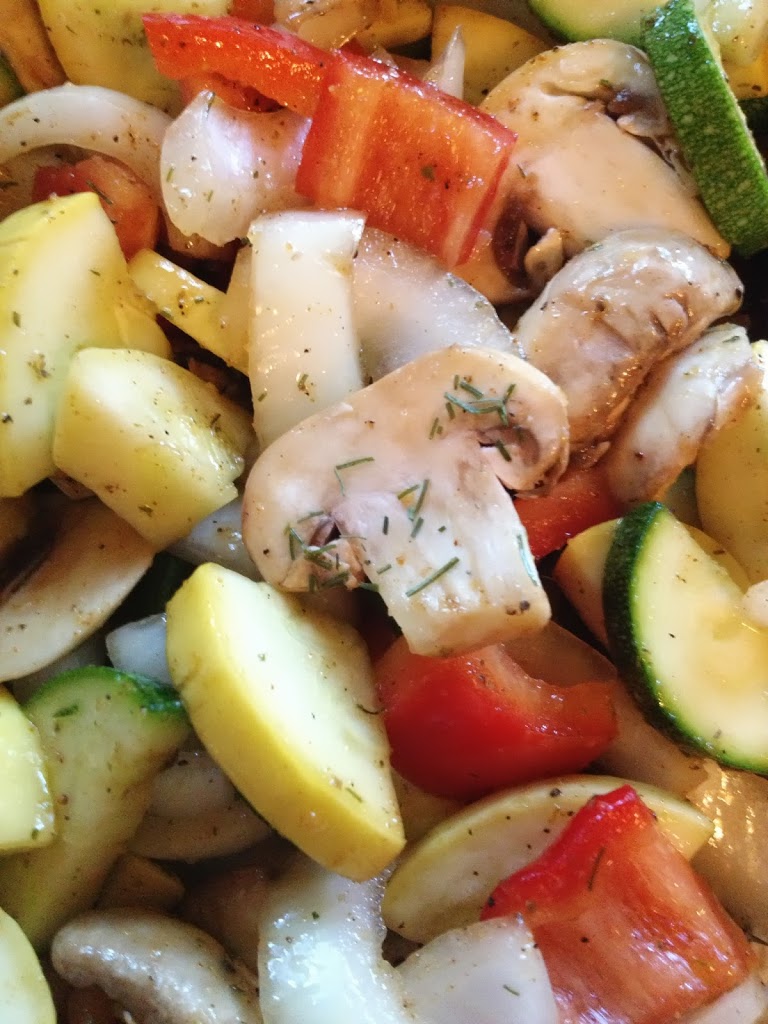 |
| Mixed vegetables (onion, squash, red pepper & mushroom): toss with olive oil, salt, pepper and dill |
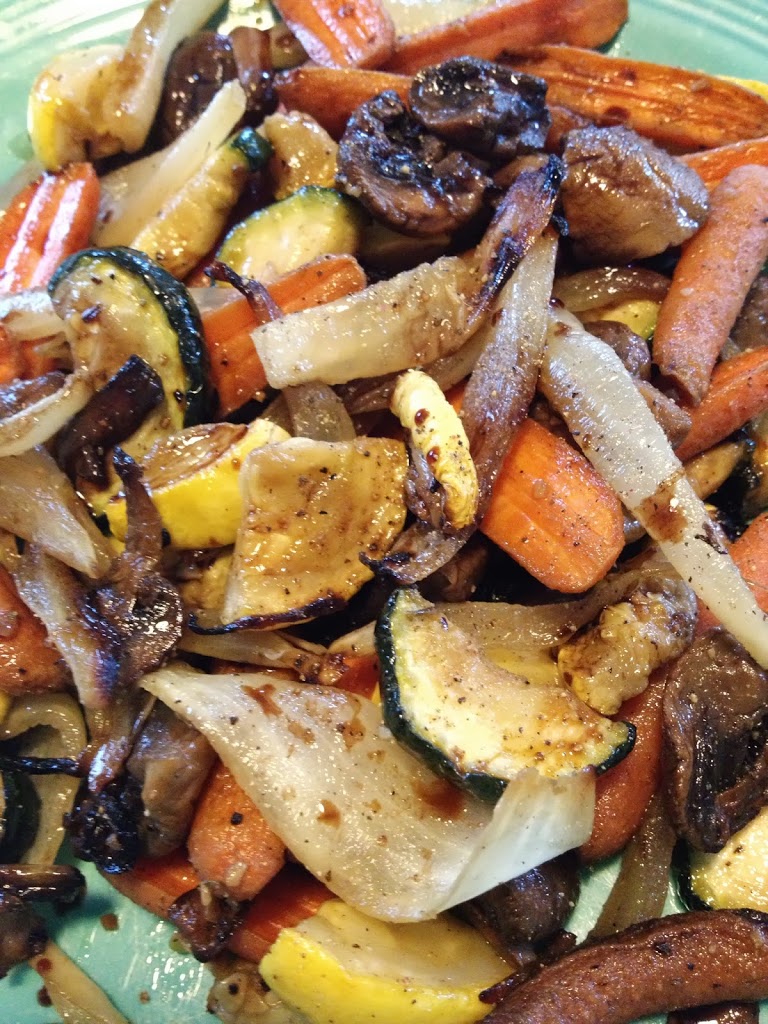 |
| Grilled onion, squash, carrot & mushroom: toss with olive oil, salt & pepper and serve with balsamic vinegar |
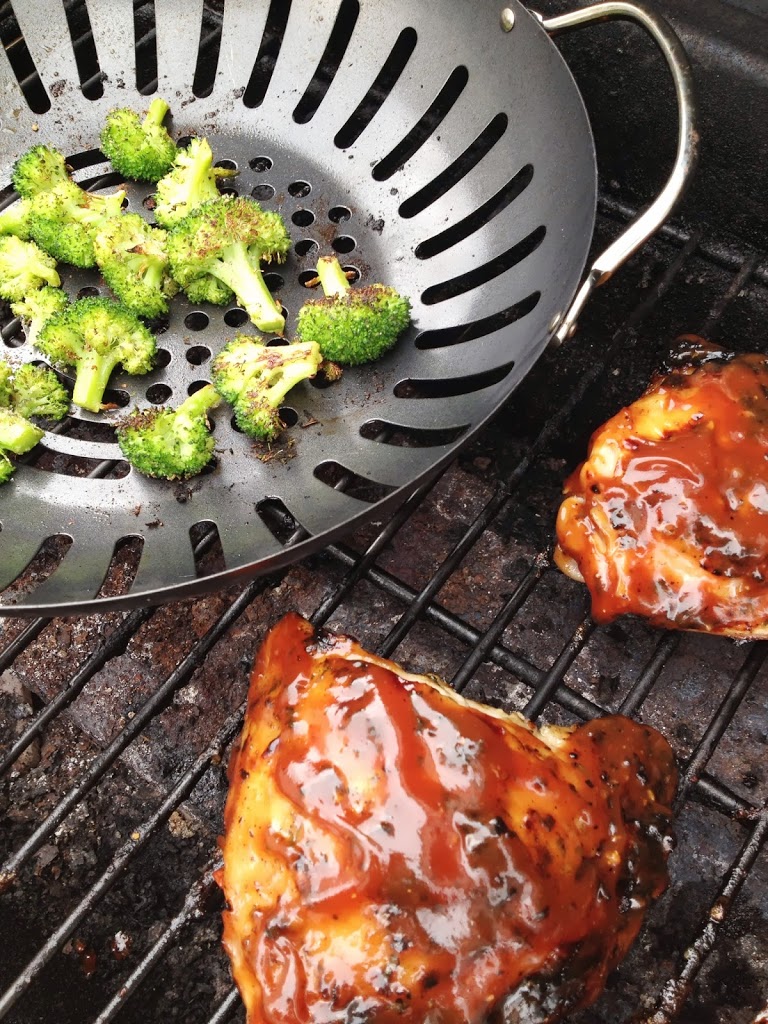 |
| Broccoli: toss with olive oil and grill seasoning |
 |
| Beets: toss with olive oil, salt, pepper & thyme and serve with Raspberry Balsamic (Click for recipe) |
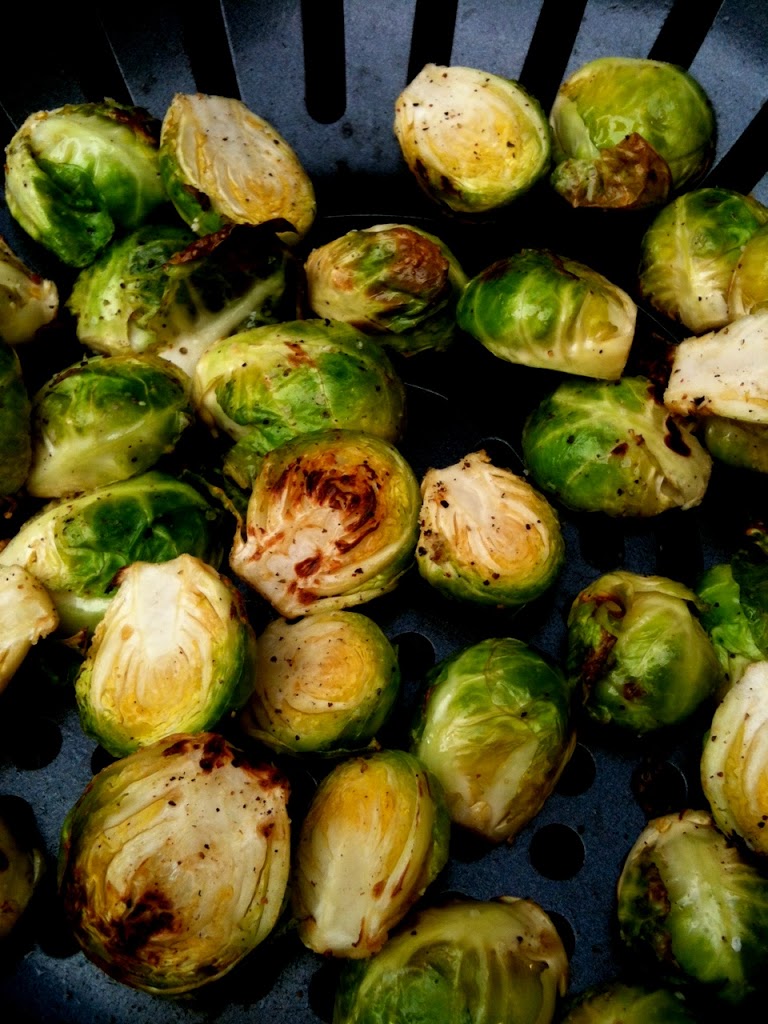 |
| Grilled Brussel Sprouts: toss with olive oil and salt & pepper |
What are your favorite ways to grill vegetables???
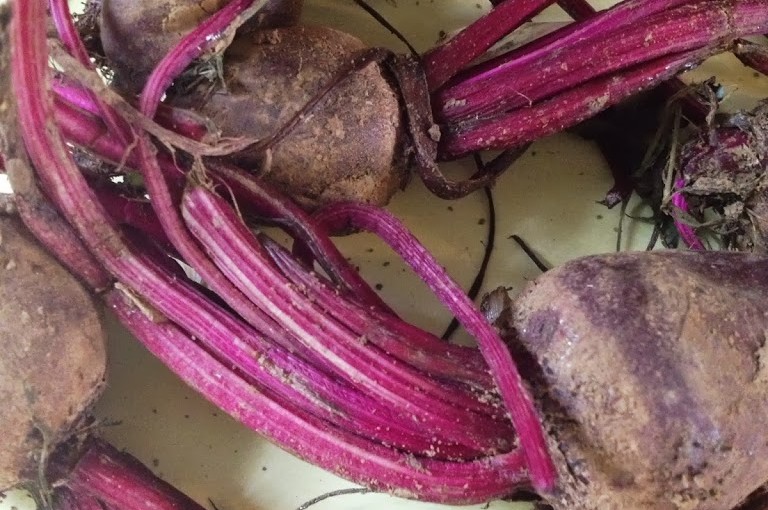
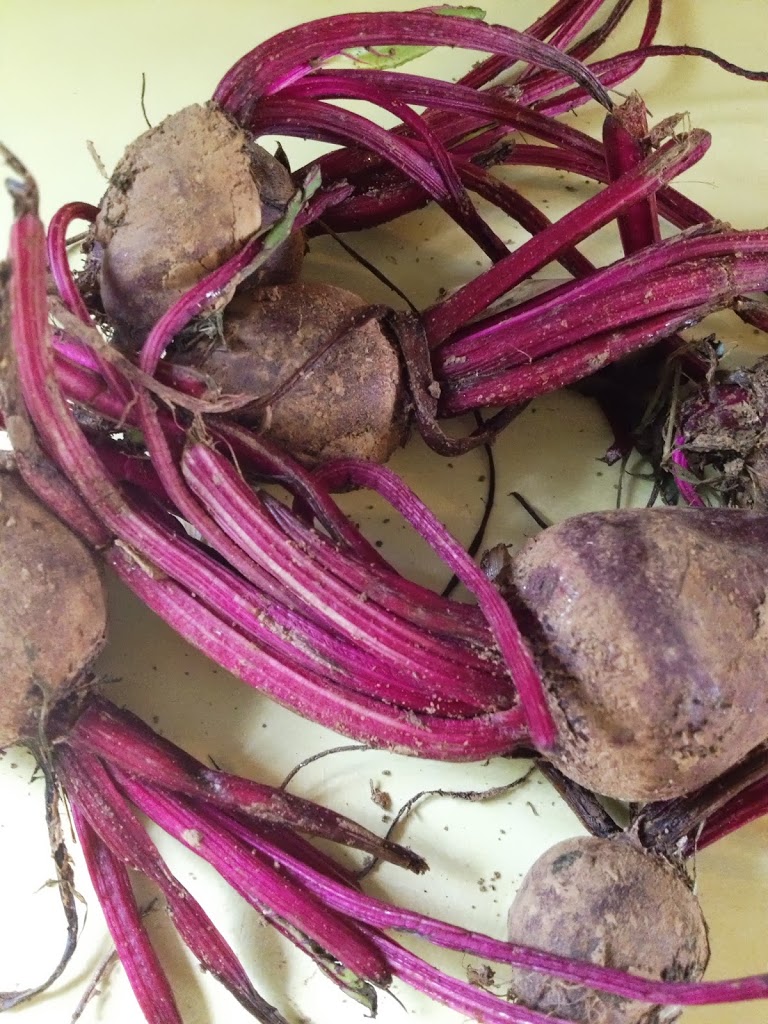
I used to think that beets came either in a can or pickled in a jar. My mother ate canned beets two ways: cold on a salad or warmed up (and slightly mushy) with a splash of vinegar. Come to think of it, at the time, I ranked cooked beets in the same category as cooked spinach because of those mushy, vinegary attributes. I typically just turned my nose up. I thought the pickled beets were just used for color and I moved them out of the way so I could get to the tasty pickled eggs hiding in the jar. I didn’t know what I was missing. Hurray for growing up and discovering those foods can be very tasty when prepared properly!
Beets are a root vegetable that are high in potassium. The leaves, which taste similar to spinach (funny that I had just mentioned spinach!) are a good source of vitamin A, iron and calcium. Buy beets that are smaller and have their root and at least two inches of stalk still attached. When cut too short, they will “bleed.” They keep for several weeks in a cool place.
I grew to appreciate the colorful root vegetable, but didn’t truly fall in love with beets until I roasted them. I stand by my conviction that all vegetables taste amazing when roasted, especially over an open flame. Cooking them slow and allowing all of the natural sugars to caramelize enhances the flavors. Some of my favorites are beets, broccoli, cauliflower, asparagus and brussel sprouts.
This recipe uses fresh thyme, though you could use dried thyme if you don’t have fresh handy. Just remember to use less when you use dried spices because the flavor can be more intense. Thyme has a robust, slightly lemony flavor and a woodsy, warm aroma. It can dominate other flavors, so it goes well with garlic, onions, red wine, meats and tomato based dishes. Just pinch the stem and pull down to remove the leaves. The leaves are small enough to just sprinkle into the dish or you can put a rough chop on them which can help release the flavor.
 Roasted Beets with Thyme (adapted from Barefoot Contessa)
8-10 Medium Beets, peeled and cut in 1 inch dice
1 1 /2 t Fresh Thyme
2 t Salt, sea salt or kosher salt
1- 1 1/2 t coarse ground Rainbow Peppercorns
3 T Olive Oil (I used the peppery Arbosana from The Olive Twist)
Preheat oven to 400 degrees or the grill to medium or medium-high (if your grill has a thermometer, heat to 300-400 degrees).
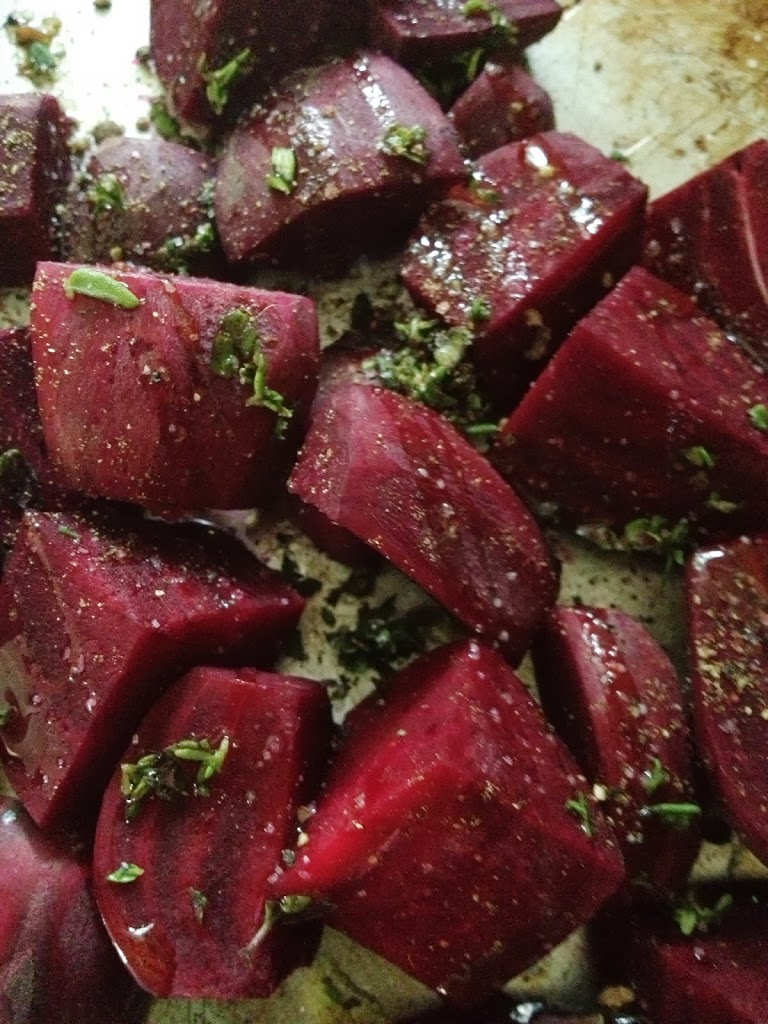 Place the beets on a baking sheet. Drizzle with the olive oil and sprinkle on the spices. Toss together to coat the beets.
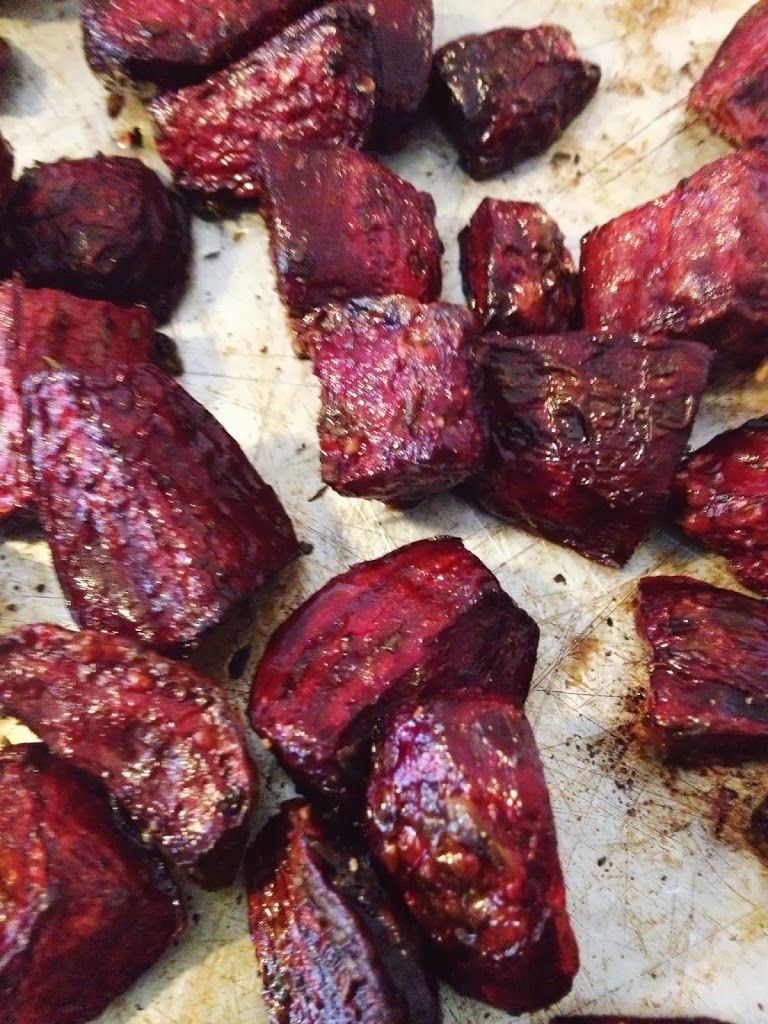 Roast in the oven 35-40 minutes or transfer to a grill pan/basket and grill for 20-30 minutes. Turn occasionally. Cook until tender.
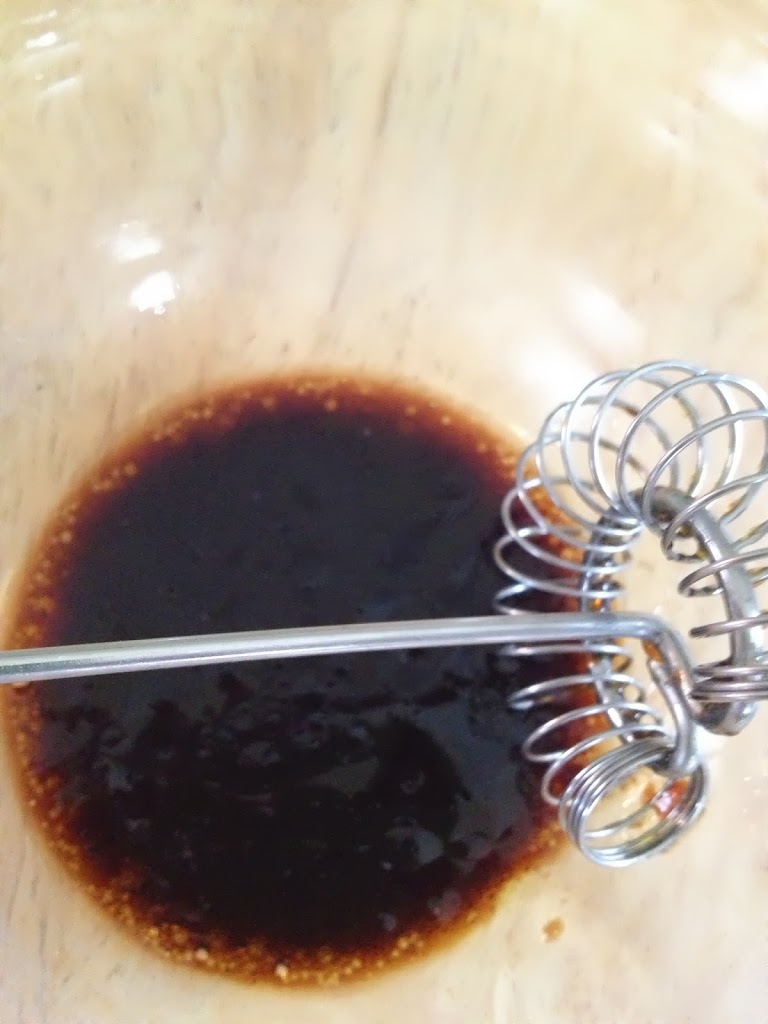
Raspberry Balsamic Reduction
3 T Raspberry Balsamic (I also get my balsamic from The Olive Twist)
1 T juice (the original recipe called for orange juice, I used some peach mango because it was in the fridge)
Whisk together the vinegar and the juice. Add a pinch of salt. Bring to a boil and cook for 2-3 minutes.
Remove the beets from the oven or grill and toss immediately with the reduction. Sprinkle with a little more salt and pepper to taste.
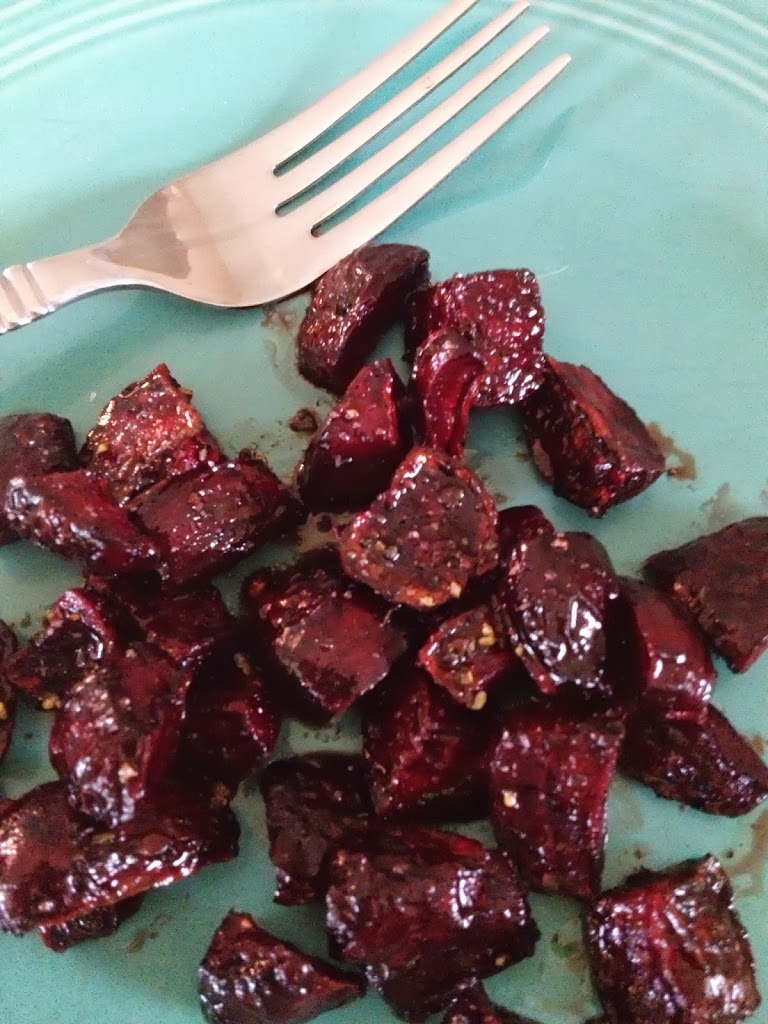
These beets make a perfect side dish for grilled flank steak, though I just eat them by themselves for a tasty lunch! They would also be perfect as leftovers on a salad. Top mixed greens with thin slices of the flank steak, beets and crumbled bleu cheese. Make a vinaigrette with the Raspberry Balsamic, juice and a drizzle of olive oil. Serve with big, crunchy croutons. Click here for my crouton recipe.
Let me know what you think about beets after trying them roasted! Enjoy!!

I am often looking for unique casual get-together foods. Dishes that are slight twists on the average fare that people might serve or bring to a party. These tasty little sammies are an adaptation of the “Sassy Ham and Cheese Sandwiches” shared by Caryn Ross on Food Network.com and in many varieties all over the web, so I can’t take total credit for them. However, baking them in a cast iron pan is one of my adaptations. Cooking in cast iron causes the buns slathered in oniony-cheesy goodness to crisp and really adds to the flavor. And of course, it wouldn’t be a recipe of mine if there weren’t some additions of great spices to jazz things up a bit. In this case, the addition of fresh grated nutmeg which I often pair with dishes that include Swiss cheese.
As I shared in my Grown-up Mac & Cheese recipe, I use nutmeg in many savory dishes including my chili for an added depth to the flavor that will have people asking what they are tasting. Nutmeg is the hard, brown seed from the nutmeg tree which is a tropical evergreen tree. Most cooks prefer to grate it fresh from the seed. The seed should be stored in an airtight container, away from heat, moisture and sunlight. Though there is some disagreement about storing dry spices in the freezer because they may lose potency, I do store my nutmeg seeds and my ginger root in the freezer. I pull them out and grate them fresh whenever I need them. I store them for many months, and have not noticed either losing any flavor or aroma.
Why cook with cast iron?? Cast iron is a great heat conductor so it’s the optimal choice for a perfect crisp. Well-seasoned cast iron is virtually non-stick, so you can use less oil when cooking. Cast iron, when cared for, lasts for decades.
Rockin’ Ham & Cheese Sliders
1 12 count package Hawaiian style rolls
8 oz thin sliced deli ham (Black Forest or honey smoked are both great in this recipe)
8 oz grated Swiss (Gruyere or Jarlsberg both melt well and are sharp flavors)
1 8 oz block or container of cream cheese
2 t chopped green onions, just the green (chives also work)
1/4 t dried thyme
1 stick butter, melted
2 T grated onion
2 T Worcestershire sauce
1/2 t fresh grated nutmeg
Homemade Tater Chips
3 Russet potatoes, thinly sliced
Vegetable Oil
Kosher or Sea Salt
Fresh Ground Peppercorns
Preheat the oven to 350 degrees.
 Mix together the cream cheese, nutmeg, thyme and green onions. Grate the Swiss cheese. Set aside.
Mix together the melted butter, grated onions, Parmesan cheese and Worcestershire sauce.

Thinly slice the potatoes. I use a mandolin to ensure even slices and that I still have fingers when I am done slicing. Pour about 1 1/2 inches of vegetable oil in a skillet for frying the chips. Preheat over medium high heat to 350 degrees, being careful not to go over the smoking point.

Cut the rolls in half and place the bottoms in the cast iron skillet. Top each with a couple slices of ham and some of the Swiss cheese. Spread a large dollop of the cream cheese mixture on the top roll and place on the sandwich.

Pour the butter and onion mixture of the tops of the sandwiches. Don’t try to be neat, part of the yumminess of these sliders is the cheese, butter and onions that are dripping out of the sandwiches and getting wonderfully crisp while they bake.
 Cover the skillet with foil and bake for 20-25 minutes. Remove the foil and and bake an additional 5-10 minutes to brown the tops.

While the sandwiches are baking, fry the potato chips. Take a paper towel and be sure to dry the slices. Carefully place 9-12 potato slices in the hot oil. Do not over-crowd the oil. Fry until golden brown, turning once half-way through.
 Remove the chips from the oil to a plate lines with paper towel to drain. Generously sprinkle with coarse ground sea salt or kosher salt and pepper while the chips are hot. Replace the towels between each batch.
 Serve the sliders and chips. My favorite way to eat homemade tater chips is to dip in a thick bleu cheese dressing. Mmmm!

Once upon a time, my mom came for a visit. She swooped in the door with a plate wrapped in paper towel and said, “you have to try this…it’s like eating eggplant chips!” They weren’t even warm, but they were crisp and flavorful. Very tasty! So, it was time to experiment a crispy fried eggplant recipe. This fried eggplant is great to just munch on by itself, but it also pairs perfectly with the simple tomato basil sauce in an upcoming post.
Eggplant is a vegetable that has bragging rights for being near the top of the list of “Brain Foods” due to it’s fiber content, vitamins, minerals and antioxidant properties. It is a flavorful and versatile food. Though there are many varieties, the typical eggplant found in America is pear-shaped and purple in color. Eggplant should be firm and the skin smooth and shiny without scars or discoloration. They are very perishable, so plan on using within a few days of purchase. Do not clean or cut prior to storing. Eggplant can be eaten with or without the skin, which can sometimes be bitter. To prepare eggplant for use, cut it with a stainless steel knife and sweat the liquid out of the vegetable by placing it on paper towel and sprinkling it with salt. Let sit for about 30 minutes and then dab the excess liquid off with another paper towel. If you need to, you can rinse to remove the rest of the salt. For this recipe, I leave the salt.


There are so many options for the breading. To keep this recipe simple, store bought crumbs are the easiest though they do have a higher sodium and sugar (corn syrup) content. A benefit of store bought crumbs is that they can be purchased with Italian seasoning. If you don’t have bread crumbs on hand, you can make your own with bread, crackers or even cereal. Just pulse in a food processor or spice grinder. Add Italian seasoning and you have seasoned breadcrumbs with control of the ingredients. If you do not have pre-mixed Italian Seasoning, you can make it by blending dried basil, oregano, thyme, rosemary, and marjoram. Some also include black pepper, garlic and red pepper flakes. For a healthier version of store bought breadcrumbs that have less additives and cook nice and crisp, use Panko breadcrumbs. For this recipe, I add grated Parmesan cheese to the breadcrumbs.

Crispy Fried Eggplant
1 Medium Eggplant with skin on, thinly sliced and sweated
1-2+ T Course ground Kosher Salt or Sea Salt (regular table salt will work)
1 1/2 – 2 C Seasoned Breadcrumbs
Binder for breading (this can be a couple eggs or egg whites beaten with a liquid added such as water or milk, or just milk)
1/4 C Grated Parmesan Cheese
Olive Oil* (to cover the bottom of the pan about 1/4 in)
*Higher quality, extra virgin olive oils have a higher smoke point or can be heated higher without burning. I use my favorite oil from a local shop, The Olive Twist (www.theolivetwist.com).
 Because this is what I would consider a lightly breaded recipe, I don’t use the typical three-step dredging process. Set-up your area like a little assembly line: frying pan with heated olive oil, bowl of seasoned bread crumbs and cheese mixture, bowl of egg/milk, sliced eggplant already sweated. I try to use the wet hand – dry hand method, but typically goof up and use the wrong hand so I end up with fingers that look like Sasquatch fingers. Dip the eggplant in the liquid and then transfer to the breadcrumbs. Cover completely with breadcrumbs by flipping the piece over. Place gently in the heated oil. Because these are so very thinly sliced, they do not take long to cook. Fry a few minutes on each side until a golden brown.
Remove from the pan and place on paper towel to remove excess oil. Remember to constantly change the paper towel to keep the food from reabsorbing the oil and becoming soggy. Sprinkle with salt. This is one of those things that are lucky if they make it to a plate because I eat them as quickly as they come out of the pan! Keep warm on a baking sheet in a low temperature oven.
Serve with your favorite pasta topped with marinara for a perfect Eggplant Parmesan. Sprinkle additional Parmesan cheese or top with melted mozzarella.


What!??! Bacon has it’s own holiday??? Of course it does! Every wonderful thing in the world that deserves to be celebrated has a holiday: the day we are born, weddings, historic events and people, days of religious significance…I could go on and on. Some holidays are local or regional, like “Fair Day” in the county where I live. Every country has special days, such as their own Independence Day. Of course, there are the favorites of retail shops and advertisers everywhere: the “Hallmark Holidays” like Sweetest Day (as if single people needed yet another reminder of their status a mere 8 months after Valentine’s Day!). Then there are the fun, wacky, sometimes serious, theme-based daily, weekly and monthly observances. Among my favorites: National Gummy Bear Day (July 15), National Pickle Day (November 14), and Squirrel Appreciation Day (January 21). I bet you are wondering about that last one!?! And, though I truly believe that bacon should be celebrated everyday, there is International Bacon Day (September 1).
So, how did I celebrate Bacon Day last weekend?? With everything bacon, of course! I started the morning filling the house with the amazing aroma of peppered bacon frying (see: http://changingseasonings.blogspot.com/2012/03/can-bacon-really-be-any-tastier-yep.html). Later in the day, I made spicy, cheese-stuffed, bacon-wrapped grilled jalapenos to snack on. Then, for dinner, zesty roasted cabbage drizzled with a maple-balsamic glaze and sprinkled with…you guessed it – bacon!
 Grilled Stuffed Bacon-Wrapped Jalapenos

6-8 large Jalapenos
6-8 slices bacon
1 8oz pkg cream cheese
Optional: favorite cheeses (I used Colby-Jack and Bleu-Jack. String cheese works well too!)
Small skewers
Wash the jalapenos and leave them whole. Make a slice through one side from about a 1/4 in. below the stem to 1/4 in. from the tip. Using a small metal vegetable peeler tip or the handle of a table spoon, scrape out the seeds and veins, being careful not to split the pepper.

Stuff the pepper with the cheese. If using a block cheese in addition to the cream cheese, cut the cheese to size and tuck in the slit in the pepper. Then fill the remainder of the space with the cream cheese. Do not over-fill the pepper or you will have a mess when you cook it. Wrap a slice of bacon around the pepper and secure with a skewer. If you are using wooden skewers, be sure to soak them for about an hour prior to using them so they are less likely to burn. Place the peppers on the grill (you can use a grill pan if necessary) and grill on medium-high. Turn the peppers to evenly roast the peppers and keep the bacon from burning. Cook until the peppers are roasted, the bacon is browned and the cheese is melted.
 Roasted Cabbage with Maple Balsamic Glaze

1 head of cabbage
6 T Balsamic Vinegar (I get my favorite from a local Olive Oil and Vinegar shop: www.theolivetwist.com)
4 T Maple Syrup
Kosher or Sea Salt
Cracked Peppercorn
Olive Oil
3 slices of bacon cooked and crumbled
Wash the Cabbage and peel of any wilted outer leaves. Slice the cabbage in rounds about 1-1 1/2 in. thick. Lay on a baking sheet and drizzle generously with olive oil. Sprinkle with salt and pepper. Roast in the oven at 400 degrees for 40-45 minutes.
Mix the vinegar, maple syrup and a pinch of the salt in a small saucepan over medium heat until boiling. Plate the roasted cabbage and drizzle with the glaze. Top with the crumbled bacon.

I enjoy food…buying food, prepping food, cooking food, eating food (not cleaning up so much though!)!! And, I subscribe to the “everything in moderation” theory of eating, as long as you combine that with exercise…I love to walk. So, not everything I blog about will be the healthiest versions of a recipe. However, one of the reasons I love using a variety of herbs and spices in cooking is that you can get intense flavors from your food without having to add fats and carbohydrates that can land the recipe in the “unhealthy food” category. I was given the idea for this recipe a couple of weeks ago at work, and experimented with varying amount of spices to produce a tasty breading for a healthy version of onion rings.
Two things make these onion rings healthy: the bran-based breading and the fact that they are baked, not fried.

You will need:
2 C bran cereal
1 tsp whole rainbow peppercorns
1 T course ground garlic with parsley
2 eggs (whites only)
1 large Vidalia Sweet onion

Peel the onion and slice in 1/2 in wide slices. Separate the slices and place in a bowl of cold water until you are ready to use them. Put the bran cereal, peppercorns and garlic in a spice mill or food processor and grind until a fine powder. Pour into a bowl. Put the two egg whites in another bowl.

Dry the onion slices. Dip each slice in the egg whites and then place in the bran breading and toss until covered. Tap gently on the edge of the bowl and then place on a baking sheet that has been lightly sprayed with cooking spray. Spray the breaded slices lightly with the cooking spray, and place in an oven that has preheated to 375 degrees.

Bake for 20-30 minutes depending upon the thickness of the slices, turning once half way through.

The onion rings will be crispy on the outside and tender on the inside…and very flavorful. You won’t miss the grease! Now you can enjoy onion rings that are healthy and simple to make without having to bring out the fryer. Yummy! So we are clear though, I will still, on occasion, have the strong desire to dip onions in a beer batter and fry them in a pot of hot grease!! I’ll just have to walk a little further that day! Enjoy!!

You know those go-to foods…the ones you always have on hand or can quickly prepare!??! One of my favorites is homemade croutons. I use the croutons for salads, soups and just to munch on. They are the perfect compliment to the roasted garlic, that I blogged about previously, as a quick and easy appetizer for those unexpected visitors. Using homemade croutons to top salads and soups (even just jazzed up store bought soups!) gives the meal a personal touch…it’s all about the presentation, you know!
I love, love, love bread! So, there is always some kind of bread around that I can use for croutons. And even though you can use any ol’ sandwich bread or even leftover buns, my favorite croutons are from day old (or several days old!) crusty bread such as a French Baguette. Slice the bread about 1/2 inch thick and cut to about 1 1/2 inch pieces. The Baguette is already a perfect size, so I just slice it and am ready to season.

There are many different spice blends that work well for seasoning croutons. Any of the store bought blends for dipping bread in olive oil are fine, but you can also mix your own. By mixing your own, you control the amount of your favorite flavors you use. I make a mix of Italian spices and Parmesan cheese, heavy on the garlic of course!
Parmesan Herb Seasoning Blend:
1 teaspoon dried parsley flakes
1/2 teaspoon dried minced onion
1/4 teaspoon dried oregano
1/4 teaspoon dried basil
1/4 teaspoon dried thyme
1/2 teaspoon coarse ground garlic
1/8 teaspoon coarse ground pepper
pinch of fresh ground nutmeg (I keep whole nutmeg in the freezer and just add it to the recipe with my micro-plane)
3 tablespoons grated Parmesan cheese (a mix of Parmesan Romano would be tasty too)
Preheat the oven to 425 degrees. Lay the bread slices on a baking sheet. Generously drizzle with your favorite olive oil. I am tossing the bread with Picholine Olive Oil (which has a lighter flavor that won’t over power the flavors of the spices) and topping with just a light drizzle of Garlic Infused Olive Oil from our local gourmet olive oil and vinegar shop, The Olive Twist.


 Sprinkle a couple palmfuls (for the grammatical record, the computer doesn’t like the word palmful, but I am adding it as a scientifically based measurement term) of the seasoning blend over the bread. Then, using your hands, toss the bread to lightly coat both sides of the pieces…adding more oil and/or spices as needed. To enhance the garlic flavor, I’m drizzling a bit of the Garlic Infused Olive Oil and then adding a dusting of grated Parmesan cheese just before baking for that extra Parmesan crunch.
Toast the croutons at 425 degrees, turning once half way through baking, for 12-15 minutes. Be sure the croutons cool completely before placing them in a storage container or bag so they stay crisp.

For a quick appetizer, set out the croutons with a bowl of roasted garlic as a spread. You can also toss sliced ripe grape tomatoes, fresh basil, roasted garlic and olive oil, and top the tiny toasts with a piece of Mozzarella cheese and the tomato mixture for a yummy Bruschetta. In the summer, I even toast the bread on the grill. When grilling, the bread only takes a couple minutes each side to toast.
This recipe introduces the use of pre-mixed spice blends for achieving a particular flavor in a recipe. Having spice blends on hand make it fast and simple to transform an unexciting, tasteless meal into something full of flavor!